Showing posts with label Peaceful Boughs stamp set. Show all posts

Monday, November 30, 2020

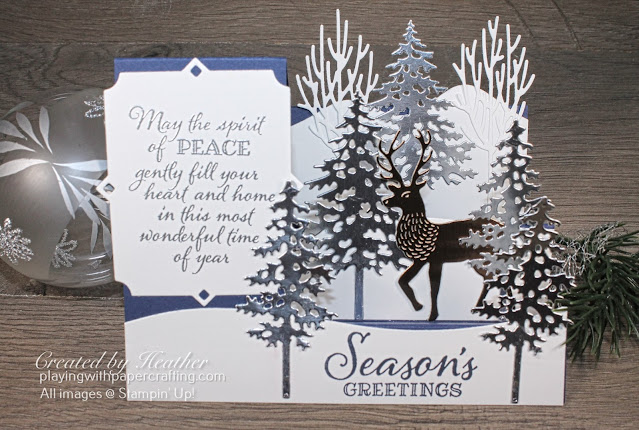
A Side Step Card with Peaceful Boughs


side step card with peaceful boughs

Stampin' Up! has so many beautiful die sets that make trees now that it isn't hard to create a die cut forest of snowy trees to populate a snowy diorama-like display for a Side Step Fancy Fold card. I've been thinking about doing something like this for awhile, and since I got my newsletter finished and posted yesterday, I had a little time today to come up with an interesting design.

I'm planning to recreate this card and show you how to do a side step fancy fold in my Facebook Live session today at 11 am on my Playing with Papercrafting Facebook page. It's been converted into a YouTube video for you here:


Now, take a closer look and I'll list the materials and measurements here:

side step card with peaceful boughs 2

  • To create the card base for this fancy fold Side Step card, I used the following template (cut on the solid lines and score and fold on the dotted lines):
sidestep diagram

  • After scoring and folding the card base I used the curved snow bank dies from the Pine Woods Die set to die cut the snow curves for the steps. I started with Whisper White cardstock with these dimensions:
        5 1/2" x 1 1/4", 3 1/2" x 1 1/2", and 3 1/2" x 2 1/4"
  • The sentiment on the side piece is from Peaceful Boughs and it's embossed in Silver Stampin' Emboss Powder on a piece of Whisper White cardstock that measures 2 3/4" x 3 1/4".
  • The reindeer is die cut from Bronze Brushed Metallic cardstock measuring 2" x 3".
  • The white trees can be die cut with the dies from In the Woods die set on a piece of Whisper White measuring 3 1/2" square.
  • The large evergreen is from the Pine Woods Dies and is die cut from a piece of Silver Foil at least 2 1/4" x 3 1/4". You'll need 2 of those.
  • You'll need 3 smaller evergreens, die cut from Silver Foil pieces at least 2 1/4" x 3 1/4".
  • Then you just have to glue everything on the card base, making sure the edges of the objects do not overextend the edge of the card.
And that's it! Watch for the video later today!

Happy Stampin'

side step card with peaceful boughs 3

If you live in Canada, and don't have a Stampin' Up! demonstrator, I'd love to be yours. I can help you with ideas, get you catalogues and provide you with Stampin' Up products. You can leave a message in the comments or contact me using any of the methods listed in the right side bar at the top of the page. You can shop with me from anywhere in Canada by clicking on the SHOP NOW button in the top menu or clicking on any of products below from my Online Store.

Product List

Wednesday, November 18, 2020

Simple But Elegant Christmas Card Using Brightly Gleaming

simple but elegant christmas card 1

 One product that I got a lot of use out of last year is the Brightly Gleaming Specialty Designer Series Paper and it was brought back in this year's catalogue. I happened to have a partial pack left over from last year and I thought it was time to use it up. Because it is such elegant and beautiful paper, it doesn't need much added to it to create a Christmas greeting card with big impact! All it really needs is a stylish sentiment in an eye-catching label, some embellishments and you have a beautiful card that anyone would be pleased to get from you. In fact, this would be a great card to mass-produce and you could even leave off the ribbon and the rhinestones and it would still look great and be cost effective.

simple but elegant christmas card 2

  • This design from the Brightly Gleaming Specialty DSP has a Pretty Peacock base with copper foil flourishes, so I used Pretty Peacock for my card base and backed the DSP with Copper Brushed Metallic cardstock.
  • Before gluing them all down though, I die cut the label backing from the center of the backing layer, since, with the stiffness of this specialty DSP, you won't notice the absence of that piece at all. 
  • The label and it's backing are die cut using dies from the Stitched So Sweetly Die set. They are nested dies meant to fit together.
  • The sentiment from the Peaceful Boughs stamp set, is stamped on Very Vanilla cardstock with Pretty Peacock ink.

simple but elegant christmas card 3
  • The ribbon is from the Basketweave and Metallic Combo Ribbon Pack and Champagne Rhinestones from the Annual Catalogue were also added.
  • The label is popped up on dimensionals.
november technigue class

  • I hope you were able to catch my November Online Technique Class last night on my Facebook page, but if not, you can still find it there for a day or two. If you didn't purchase a card pack and one of the three options, it's not too late. I can still put together a class package for you and mail it out. To register click HERE.
Find out all the details HERE.

simple but elegant christmas card 4

If you live in Canada, and don't have a Stampin' Up! demonstrator, I'd love to be yours. I can help you with ideas, get you catalogues and provide you with Stampin' Up products. You can leave a message in the comments or contact me using any of the methods listed in the right side bar at the top of the page. You can shop with me from anywhere in Canada by clicking on the SHOP NOW button in the top menu or clicking on any of products below from my Online Store.

Product List

Friday, December 20, 2019

Peaceful Boughs for Customer Thank Yous


At this time of year, I like to send out customer thank you cards with orders that convey a holiday greeting as well as a thank you for the order. I have used the Beautiful Boughs Dies a lot over the course of the Holiday Catalogue, but I haven't used the coordinating stamp set, Peaceful Boughs a whole lot. I decided to use them today.

I was inspired, actually, by the palette of the Christmas decor and house design of one of the celebrities on Love It or List It Vancouver, Jillian Harris, who just so happens to live in my city of Kelowna. Her house has beautiful tones of creams, and peach and whites and her Christmas decor is the same, but adds gold as well. You can see the photo if you click on her name above!


Here's a closer look:


  • I started by taking sheets of Shimmery White cardstock and watercolouring them with Petal Pink ink and water. I then cut up each sheet into four        4 3/4" x 3 1/4" pieces. 
  • I used Versamark to stamp on the two largest pine boughs and the Season's Greetings sentiment. I then covered the images with Gold Stampin' Emboss powder and heat set the images. Most of them I left like this before adding the Snowflake Sequins and gluing to the card front.
  • On a few, I also embossed 2 pinecones in Gold Stampin' Emboss Powder and die cut them and the large and medium pine boughs from Whisper White cardstock.                                                                    
  • These I added to the card front using Glue Dots. Then a few Snowflake Sequins were added as well.
I hope my customers like these, and I hope you do too!


Click on the links below to take you to my On-Line Store, where you can read about, look at, and purchase if you wish, the products used to make this card today.  


Product List