Showing posts with label Stitched Shapes dies. Show all posts

Friday, February 5, 2021

Sweet Strawberry Berry Blessings for As You See It Challenge #243

sweet strawberry blessings aysi 243 1

 It's Friday of an As You See It Challenge Week and this week we have a colour challenge. Here is the banner: 


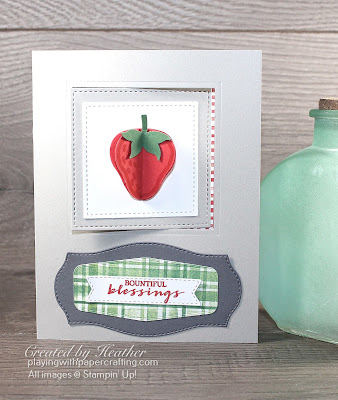
The challenge is entitled Neutral Pops for reasons you can see from the photo in the banner. As I looked at the combination, I thought of the Sale-A-Bration reward: Berry Blessings, a Level Two reward for an expenditure of a minimum of $120 on one order before tax and shipping. It consists of the Berry Blessings stamp set and the Berry Delightful Designer Series Paper.

The reason I chose this set was that the paper included both Poppy Parade and Garden Green in it. I also have the Strawberry Builder Punch, so I thought I could also create a 3D strawberry for the front of the card, and since my February Online Technique Class has a theme of Fun Folds, I decided to make this card a Lever Fold card.


  • The card front is pretty clean and simple, in compliance with the banner photo which has a clean, almost industrial look - mostly neutral with little pops of colour. My pops of colour are the Poppy Parade strawberry and sentiment and the DSP backing the sentiment.
  • The strawberry is 3D. I punched out 4 shapes. Not having the Sweet Strawberry stamp set, I had to make do in order to add some details to the shapes. I used my Poppy Parade Dark Stampin' Blends Marker to outline the shape and add some seeds on the left hand side. I folded all the shapes in half with the seeds on the inside. Adhesive was applied on the outside and the four were glued together side to side, forming a 3D shape.
  • The inside is the magic of the Lever Fold card that we'll learn at my class, so if you want to learn how to do that, click HERE to register. We'll be making 2 other Fun Fold cards, too.
  • The panels on the inside have more of the Berry Delightful Designer Series Paper.
  • The inside sentiment and image are both from the Berry Blessings stamp set.

Did you realize that this is the last month of Sale-A-Bration until July? If you want to earn any of the current rewards you have to do it THIS MONTH!  And yes, it IS shorter this year! That's because it has been divided into two parts! The next time Sale-A-Bration comes around will be July and August, the rewards will be quite different, so don't miss out on these one!

Also, did you know that Sale-A-Bration was the best time to sign up to become a Stampin' Up! Demonstrator because there is always a special incentive to do that. This year, its 200 sheets of 6" x 6" brand new DSP in all the Stampin' Up! colours! 

If you'd like to join my team, click HERE or contact me for more information.


Now you can buy the Hey, Chick and Hey Birthday Chick Bundles for yourself!! Here's the details:


If you live in Canada, and don't have a Stampin' Up! demonstrator, I'd love to be yours. I can help you with ideas, get you catalogues and provide you with Stampin' Up products. You can leave a message in the comments or contact me using any of the methods listed in the right side bar at the top of the page. You can shop with me from anywhere in Canada by clicking on the SHOP NOW button in the top menu or clicking on any of products below from my Online Store.

Product List

Monday, January 25, 2021

Treasures of Life for Monday Morning Live!

treasures of life 1

 The first time I saw this stamp set, Treasures of Life, my heart melted. This cling stamp set was inspired by Million Sales Achiever Gail Murray and I know she must also be a grandma because I have some photos that are very like the ones in this stamp set! And the sentiments almost make me want to wipe away a tear or two. 

I've been dying to use it and I decided to make it a Monday Morning Facebook Live video today, because it's a great set to demonstrate using the Watercolour Pencils. So I will be going live with the tutorial on my Facebook page, Playing with Papercrafting at 11 am PST, and you can find the list of materials and measurements here.


It's a great set to use with the Watercolour Pencils because it has a sketchy style and that make the sketchy look of the pencils appropriate. Of course, you don't have to keep that sketchy look. You can use the blender pen with them and smooth out the colour to blend it. If you're doing that on Very Vanilla or Basic White cardstock, you must be careful not to go over and over it or your cardstock will begin to break down and pill. 

You can also use the Water Painters with it, but then be sure to start on the Watercolour Paper.

treasures of life 2

  • Start with a Crumb Cake card base cut at 8 1/2" x 5 1/2" and score at 4 1/4" on the 8 1/2" side. 
  • Cover with 2 designs from the In Good Taste Designer Series Paper, as shown, the larger on cut to 4" x 5 1/4" and the smaller one cut to 3 3/4" x 5".
  • I used a strip of Very Vanilla cardstock measuring 3" x 9" to stamp the images on, leaving room for sentiments, if stamping them directly on the DSP isn't successful. I stamped each image in Memento Tuxedo Black ink.

treasures of life 3

  • I used the following Watercolour Pencils to colour in the images:              Basic Gray for Grandpa's hair and pants, Cherry Cobbler for Grandpa's scarf and Jr's coat, Night of Navy and Balmy Blue for Grandpa's coat, Early Espresso for Jr's pants and Grandpa's shoes, Coastal Cabana for Jr's hat and scarf, Garden Green & Old Olive for Jr.'s boots, Calypso Coral for the skin colour, Crushed Curry highlights on Grandpa's shoes
  • Details of how to colour will be on the Facebook Live.
  • The images are die cut using a modified Stitched Rectangle die and a Stitched Shape Circle die.
  • A strip of Soft Suede, measuring 3" x 11" is used to die cut backings for the images using the Stitched So Sweetly dies and the Stitched Shape dies.
  • The sentiments are stamped right onto the DSP using the Memento Tuxedo Black ink. Should there be a problem, they can be stamped onto the vanilla cardstock and die cut using the Stitched So Sweetly dies and glued on.
  • After being mounted on the backings the images can be adhered to the card using dimensionals on the front and Seal in the interior.
Here are my six grandchildren, that really are the treasures of my long life:

grandkids 1
Kesten and Cedar

grandkids 2
Parker and Jackson

grandkids 2
Wyatt and Pippa


treasures of life 4

If you live in Canada, and don't have a Stampin' Up! demonstrator, I'd love to be yours. I can help you with ideas, get you catalogues and provide you with Stampin' Up products. You can leave a message in the comments or contact me using any of the methods listed in the right side bar at the top of the page. You can shop with me from anywhere in Canada by clicking on the SHOP NOW button in the top menu or clicking on any of products below from my Online Store.

Product List
Blender Pens
[102845]
$16.25

Friday, May 15, 2020

Simple Stamping with the Retiring Slice of Happiness


This blogpost is Plan B. Plan A was an unboxing of my new 2020/21 Annual Catalogue Preorder, but as of the time I write this, it still hasn't been delivered. I haven't yet received a notice that the delivery date has changed, like I have for the past 3 days!!! UPS is SUCH a tease! But it's far too late in the evening to tape a video so that will have to wait for a new day. I've never received an order this late at night before, so I'm not holding out much hope that it will arrive today either, but I suppose stranger things have happened and I know UPS is busier than at Christmas right now and short of drivers!

So, back to Plan B. I decided to do some #simplestamping! Stampin' Up! has had a focus on that for the last year, at least! I'm not good at simple stamping. I don't know when to stop to make something simple, so I thought that this would be quick, easy and good practise when I'm short on time. I wanted to use a retiring set, and I focused on Slice of Happiness. This poor set really hasn't had a ton of use this year and I'm sad to see it go. It's ideal for simple stamping because it's a distINKtive stamp set, which means that the images are very realistic. And because this is one of the best working distINKtive sets I've ever used, it is perfect for a beginner's card, because it gives them a striking result just using paper, stamps and ink!


  • I've paired up this stamp set with the See a Silhouette Designer Series Paper, which is also retiring and on sale now for $11.81. The mix of Mossy Meadow, Night of Navy and Old Olive on the paper and the Granny Apple Green of the grapes work well together.
  • Isn't amazing the many shades of green you get with the distINKtive stamp using only one colour of ink - Granny Apple Green. It gives the image such depth!
  • If I was doing a beginner class with this design, I would have the panels for the grapes and the sentiment pre-cut, the former using the Stitched Shapes dies.
  • The sentiment is from the same stamp set - Slice of Happiness, a cling set. The card base is a Notecard, from a pack of 20 Notecards & Envelopes, a great suggestion for a beginner to buy to get started.
  • The background paper in this one is also from the See a Silhouette DSP. It has tones of Real Red, Mango Melody, Crushed Curry and a little Rich Razzleberry, I think.
  • The pomegranates were stamped in Cherry Cobbler ink, but look at all the tones the stamp creates! Awesome!
  • The sentiment is stamped in Granny Apple Green.
  • The image panel is die cut with the Stitched Rectangles dies. As before, I would have done that before the class, so it's not something that the beginner stamper would have to worry about.
  • The final image is of a Kiwi fruit, stamped here in Old Olive ink. The image panel is popped up on dimensionals on a panel of retiring Tropical Oasis Designer Series Paper and both are added to more See a Silhouette paper mounted on the front of a Notecard. 
  • The sentiment, also from the same stamp set, is stamped in Cherry Cobbler ink and punched using the Timeless Label punch.

If you live in Canada, and don't have a Stampin' Up! demonstrator, I'd love to be yours. I can help you with ideas, get you catalogues and provide you with Stampin' Up products. You can leave a message in the comments or contact me using any of the methods listed in the right side bar at the top of the page. You can shop with me from anywhere in Canada by clicking on the SHOP NOW button in the top menu or clicking on any of products below from my Online Store.


Product List


*Retiring Products - available while supplies last, until June 2, 2020.