Showing posts with label Stylish Shapes Dies. Show all posts

Friday, May 10, 2024

Stippled Rosed & Wild Ferns for As You See It Challenge #323

stippled roses & wild ferns for aysi #323 1

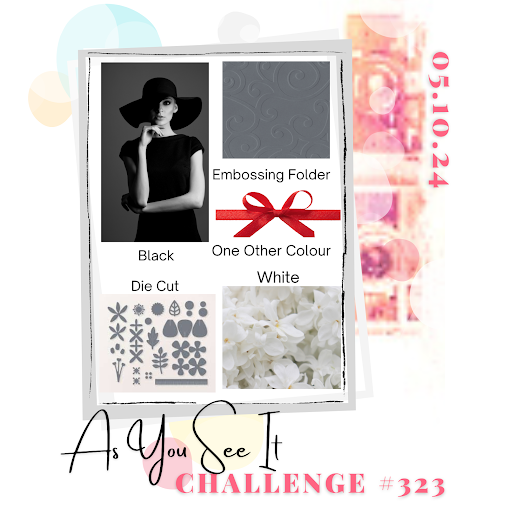
 I love Recipe Challenges and the latest one, cooked up by my team mate Jan, is a great one because it's so dramatic, it has a lot of colour ingredients, and it's different from usual. I love that! You've got to keep things interesting, right?
Here's the Challenge Banner:
challenge #323

Although there are a lot of new stamp sets from the 2024/2025 Annual Catalogue I could have chosen for this, I decided to use two sets from the just retired Jan/Apr Mini Catalogue. The sets themselves are not retired however, they were carried over into the new Annual Catalogue. Thank goodness, because I just didn't get enough time to play with them. So I used the Stippled Roses and Wild Ferns bundles. The other reason I chose these two was that I couldn't decide on what the "other colour" would be. I was vacillating between Lemon Lime Twist and Poppy Parade, both colours that are great looks with black and white. I finally decided to do two cards and use both colours, so Stippled Roses would go great with Poppy Parade and Wild Ferns with Lemon Lime Twist!

Anyway, take a look at how they turned out:

wild ferns for aysi #323

stippled roses for aysi #323

  • Both cards start out with Basic Black card bases, cut at 5 1/2" x 8 1/2", and scored at 4 1/4".
  • The next layer is 4" x 5 1/4" and is Lemon Lime Twist for the Wild Fern card and Poppy Parade for the Stippled Blossom card.
  • I cut 2 pieces of 3 3/4" x 5" of Basic White cardstock and embossed each one using the new Dotted Circles 3D embossing folder. Wow! Now that is an enhanced texture! These panels were added to each of the card fronts.
  • On a piece of Basic White cardstock, I stamped 3 of the fern images in Lemon Lime Twist as well as the sentiment you see in the photo. Switching to Poppy Parade I stamped the large roses image, the single rose image and the Happy Mother's Day sentiment. 
  • I die cut all the Wild Fern image and sentiment with dies from the Wild Fern die set.
  • I die cut all the roses with dies from the Stippled Roses dies. The sentiment was die cut with a die from the Stylish Shapes dies.
  • I die cut a matte for the sentiment with a larger circle die from the Stylish Shapes set and Poppy Parade cardstock.
  • I die cut the 'fern frames' to surround the sentiment from Lemon Lime cardstock. A problem I encountered was: to completely surround the sentiment, you need to turn one of those die cuts over, but the backside of the die cut is not as good quality as the front. I remedied that by using what I could of the second border piece and cutting off what didn't fit, then tucking it up where there was no border piece. 
  • The ferns that had been stamped and die cut were tucked in at two corners.
  • I wanted to add some bling, so chose the Iridescent Pearls.wild fern for aysi  #323 2
                                                       stippled roses for aysi #323 2
demo kit special


Has your mouth been watering over those new 2024 - 26 In Colours? Here's a way to get them plus $165 worth of products for only $135! This is a BIG DEAL! Here's what you would get:
    2024–2026 In Color Classic Stampin’ Pads Bundle
    2024--2026 In Color 8-1/2" x 11" (21.6 x 27.9 cm) Cardstock
    2024–2026 In Color 6" x 6" (15.2 x 15.2 cm) Designer Series Paper
    2024–2026 In Color Stampin’ Write Markers
That's well worth the price of the kit on it's own, but no! You still get to select $165 worth of the Stampin' Up! products you love, AND for a minimum of 5 months, you could enjoy a 20% discount on more SU products!

This offer is only good from May 1 - 31 so don't wait!! To Join my team, click


wild fern for aysi #323 3

stippled roses for aysi #323  3

If you live in Canada, and don't have a Stampin' Up! demonstrator, I'd love to be yours. I can help you with ideas, get you catalogues and provide you with Stampin' Up products. You can leave a message in the comments or contact me using any of the methods listed in the right side bar at the top of the page. You can shop with me from anywhere in Canada by clicking on the SHOP NOW button in the top menu or clicking on any of products below from my Online Store.

Product List

Friday, September 22, 2023

All About Autumn for As You See It Challenge #308

all about autumn for aysi #308 1

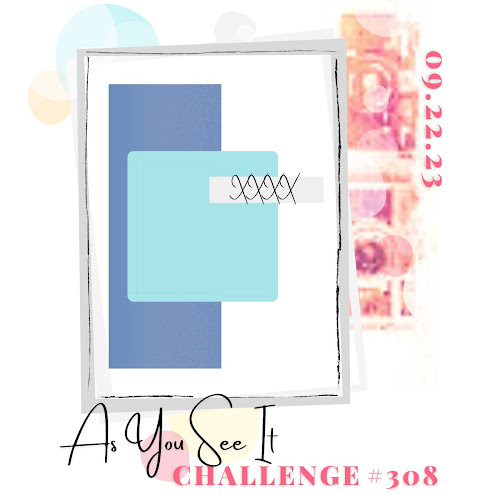
 It's time for one of my two favourite kinds of challenges over at As You See It this week: a sketch challenge. (My other favourite is the colour challenge!) Heather H. came up with a really good sketch! It's so balances and any card you make with it will look amazing, trust me. Here's the challenge banner:

challenge #308


I was thinking about using the Winter Meadow Suite for this one, but the more I played around with it, the less suited I found it, so I switched to the All About Autumn Suite. I wanted to show the switch to warmth and indoor activities like curling up in a big leather chair in front of a fire and reading a good book with a knitted throw rug covering you. It was hard to fit all that in of course, but I managed to get the knitted throw rug and the leather chair in there as mattes for the leaves and shelved books respectively.

all about autumn for aysi #308 2

  • I used a Moody Mauve base and covered it to within 1/8" of the edges with a dese All About Autumn DSP, the used the largest square die to die cut a bign from one of the patterns from All About Autumn DSP.
  • I added the narrow rectangle of autumn leaves from the All About Autumn DSP and backed it with a rectangle 1/4" larger on both sides, cut from the knitted blanket pattern.
  • I used the second largest Stylish Shape Square Die to die cut the books from thacking for it from the leather furniture pattern of the All About Autumn DSP.
  • The sentiment was stamped with Early Espresso on Moody Mauve and die cut with the largest flag die from Stylish Shapes.
  • I wrapped linen thread around one end of the sentiment flag, and tied it in a secure bow, then I added the whole flag to the card front using dimensionals.
  • The last step was adding some Adhesive Backed Speckled Dots to embellish. (See Photo)


These papers are available from the Online Exclusives section of the Online Store.


clearance rack

The Clearance Rack has been refilled with lots of products, many holiday products as well. Check it out and get incredible savings!!

all about autumn for aysi #308 3

If you live in Canada, and don't have a Stampin' Up! demonstrator, I'd love to be yours. I can help you with ideas, get you catalogues and provide you with Stampin' Up products. You can leave a message in the comments or contact me using any of the methods listed in the right side bar at the top of the page. You can shop with me from anywhere in Canada by clicking on the SHOP NOW button in the top menu or clicking on any of products below from my Online Store.


Product List

Friday, August 11, 2023

Irresistible Blooms for As You See It Challenge #305


irresistible blooms for aysi #305 1

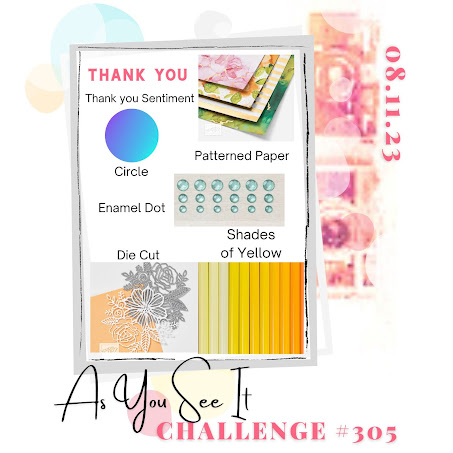
Welcome back to my blog during the hot summer days! Thanks for taking the time to read my posts, I appreciate it! Today I'm sharing a card I made as my DT sample for As You See It Challenge #305 - Recipe for Summer Sunshine. It's a Recipe Challenge, so we are given 6 elements this time, by team member Joanne, that we have to include in our card. Here's the challenge banner:

challenge #305

I looked for a stamp set with coordinating DSP that had shades of yellow in it and I came up with the Hello, Irresistible suite of products, which are from the Online Exclusive products found only on the Stampin' Up! website. You have to go to the Online Store and click on Online Exclusives from the menu in order to find them, or type in Hello, Irresistible.

As you see, we need a circle, patterned paper, a die cut, shades of yellow, an enamel dot AND a thank you sentiment for this challenge. Here's what I did with all those elements:

irresistible blooms for aysi #305 2

  • On a Basic White Thick cardstock base I added a layer of Lemon Lolly cardstock, embossed using the Exposed Brick 3D embossing folder and I blended some Daffodil Delight in over the raised bits.
  • I stamped two of the smaller flower images from the Irresistible Blooms stamp set in Memento Tuxedo Black ink. I used Lemon Lolly Stampin' Blends Combo Markers to colour in one and Daffodil Delight Stampin' Blends Combo Markers to colour in the other. I die cut them with the coordinating dies.
  • I stamped the sentiment, also from the Irresistible Blooms stamp set, in Memento ink on Basic White cardstock, and die cut it using one of the sentiment flags from Stylish Shapes dies.
  • Using the Hello, Irresistible Designer Series Paper in yellow shades, I die cut two rings, using the nesting stitched circles from the Stylish Shapes dies.
  • I arranged these items on the card front and adhered them with liquid glue and Mini Dimensionals.
  • I added 3 Daffodil Delight Glossy Dots to complete the elements needed.
bonus days

If you earned any Bonus Day Coupons during July, NOW is the time to redeem them. You would find them in a email sent to you from Stampin' UP!

kits' sale

kits' sale deets

irresistible blooms for aysi #305 3

If you live in Canada, and don't have a Stampin' Up! demonstrator, I'd love to be yours. I can help you with ideas, get you catalogues and provide you with Stampin' Up products. You can leave a message in the comments or contact me using any of the methods listed in the right side bar at the top of the page. You can shop with me from anywhere in Canada by clicking on the SHOP NOW button in the top menu or clicking on any of products below from my Online Store.

Product List