Showing posts with label gate fold card. Show all posts

Wednesday, June 23, 2021

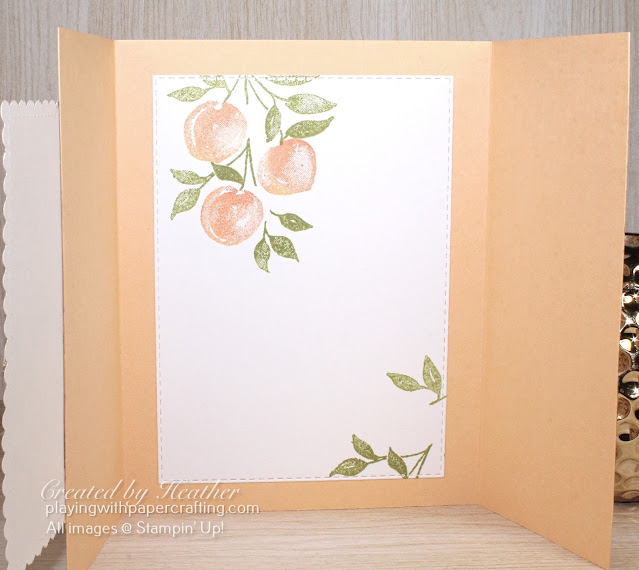
Sweet As A Peach Gate Fold Card for July's Newsletter Tutorial

sweet as a peach gate fold for july's newsletter 1

 It's almost time again for another newletter and with each month's newsletter, comes a free photo tutorial PDF download. For July's newsletter, I will be featuring a really cute Gatefold Card using the Sweet As A Peach Bundle.

sweet as a peach gate fold for july's newsletter 2

  • The Pale Papaya card base is folded to open like a gate in the middle of the card front. This is very easy to learn how to do. Then a smaller panel is added to the front, adhered to only one side, but spanning both sides of the middle.
  • In the tutorial, I will show you how to use a sponge dauber to add a second colour of ink to the stamp before stamping. The peach stamp is perfect for this.
  • We use 3 different die sets for this card. All purchasing information and links are provided in the tutorial.
  • The tutorial gives you clear step-by-step instructions illustrated with photos. It also lists all materials used and measurements are given as well.
sweet as a peach gate fold for july's newsletter 3

If you would like to receive this tutorial, all you have to do is subscribe to my free monthly newsletter. Just scroll down to the bottom of the page to where it says Sign Up for Updates and enter your name and email address in the fields provided and click on Sign Up! It's as simple as that, and it is equally as easy to unsubscribe whenever you desire.

sweet as a peach gate fold for july newsletter 4

If you live in Canada, and don't have a Stampin' Up! demonstrator, I'd love to be yours. I can help you with ideas, get you catalogues and provide you with Stampin' Up products. You can leave a message in the comments or contact me using any of the methods listed in the right side bar at the top of the page. You can shop with me from anywhere in Canada by clicking on the SHOP NOW button in the top menu or clicking on any of products below from my Online Store.

Product List
Genial Gems
[155500]
$11.00
Peach Dies
[155829]
$31.00

Tuesday, October 29, 2013

Deck the Doors

I want to show you my favourite project from my craft retreat this weekend.  It is not my design.  I found it on Pinterest, designed by Lynn Pratt, but it was so much fun to make and I love how it turned out.  Here's my version:


  • I used Cherry Cobbler cardstock for the door, but some of the panels you can see are sponged with Cherry Cobbler ink, making them darker.  The back panel is sponged around the edges, but the second panel is sponged all over.
  • Cut the cardstock at 5 1/2" x 8 1/2", score it at 2 1/8" and 6 3/8", and fold the sides in on the score lines to make a gate fold card.
  • The curve of the top of the door, I achieved with my second largest Oval framelit and I used that to help me make the curves on the top panels of the door the same as the top of the door.
  • The wreaths are made from Old Olive cardstock on top and Always Artichoke cardstock underneath. I punched two 1" Circles on each colour, then centered a 1 3/4" Scallop Circle Punch over the circle and punched it out to make the wreath shape.
  • The door handle panels are cut using the Word Window Punch on some Gold Foil sheets then repunching it shorter.  The handles are cut from Champagne Glimmer paper using the Itty Bitty Shapes Punch Pack circle shape.
  • I added Rhinestone Basic Jewels coloured with a red Sharpie to make berries or ornaments on the wreath and tied some 1/8" Taffeta Ribbon in Real Red in a small bow, attached with a glue dot to the bottom of the wreath.
  • Inside is some Very Vanilla cardstock stamped in Cherry Cobbler with the Deck the Halls image from the Christmas messages stamp set and the little fir bough from Special Season inked up using Always Artichoke and Early Espresso Stampin' Write markers.

I'll give you the approximate dimensions of the door panels.

Bottom of the door - 4 panels:                        Top of the door:   Panel        Base      Short side    Tall side
     Largest: 1 5/8" x 1 1/8"                                                Largest panel:      1 5/8"   1 3/8"           2 1/4" 
     Middle:  1 1/4" x 3/4"                                                  Middle panel:       1 1/4 "  1 1/8"           1 3/4"            Smallest: 1" x 1/2"                                                       Smallest panel:      1"         7/8"              1 1/4"      
Have fun with this.  You can also make a rectangular shaped door and make the top panels equal to the tall side measurements.

WEEKLY DEALS!

Great news! During this festive week, there are no tricks here, only treats! Make sure you head over to the store to get your deals before they run out.


Secret Garden Framelits Dies
Item #129372 

Regular Price: $30.95
Discounted Price: $23.21 
Stampin' Pierce Mat Item # 126199
Regular Price: $5.50
Discounted Price: $4.12 
7/8" Scallop Circle Punch Item # 129404
Regular Price: $15.95
Discounted Price: $11.96 
Ovals Collection Framelits Dies
Item #129381

Regular Price: $32.95
Discounted Price: $24.71 
Paper Snips Item # 103579
Regular Price: $14.95
Discounted Price: $11.21 
Baker's Twine Island Indigo Item # 125575
Regular Price: $3.95
Discounted Price: $2.96 
Blossom Petals XL Punch Item # 121808
Regular Price: $9.19
Discounted Price: $6.89 
Keep This Memory Photobook Template
Item # 129879

Regular Price: $21.95
Discounted Price: $10.97 


Thanks for dropping by my blog today.  Have a lovely Tuesday!         

Stamps:  Christmas Messages (w131790; c131793); Special Season (w131766; c131769)
Paper:  Champagne Glimmer Paper (127885); Gold Foil Sheets (132622); Cherry Cobbler (119685), Old Olive (100702), Always Artichoke (105119) and Very Vanilla (101650) cardstock     
Ink:  Classic Stampin' Pad in Cherry Cobbler (119681); Stampin' Write Markers in Always Artichoke (131262 - as part of the Regals collection) and Early Espresso (119680); red Sharpie marker
Accessories:  Rhinestone Basic Jewels (119246), 1/8" Taffeta Ribbon in Real Red (119251)
Tools:  Stampin' Trimmer (126889); Ovals Collection Framelits (129381); Word Window Punch (119857); Itty Bitty Shapes Punch Pack (118309); 1" Circle Punch (119868); 1 3/4" Scallop Circle Punch (119854)
1" Circle Punch

Champagne Glimmer Paper

Christmas Messages Stamp Set

Itty Bitty Shapes Punch Pack

Ovals Collection Framelits

Stampin' Trimmer
1 3/4" Scallop Circle Punch

Special Season Stamp Set

Word Window Punch

Tuesday, February 26, 2013

Arrr! Matey - a Masculine Birthday Card

Sailing ships have such romance attached to them!  Adventure, disaster, exploration, treasure, exotic ports!  I just wish I had the same experience to be nostalgic about.  One of my first dates with my hubby was aboard a friend's sailboat.  I was thrilled to be going on such an adventure, with such a handsome guy, but, as luck would have it, the seas were not too accommodating that day!  We experienced a following sea, which basically means that the boat was tossed in every direction at once!  I don't have the strongest stomach for motion anyway, and this was too much for me to handle.  I spent the bulk of the trip hanging over the edge of the boat, first afraid I would die, then afraid I wouldn't die!  I realized that I did not look in the least attractive hanging over the edge of the boat for hours and, furthermore, I was not great company during the whole episode.  But I had seriously underestimated my future spouse and he stuck around despite the whole incident!

This is a gate fold card that I cased from one of Julie Davison's cards here.  I thought the whole design of Julie's card was very masculine, except for the stamped image and so I changed that and the DSP used from Print Poetry Designer Series Paper Stack to Comfort Cafe DSP.  The sailing ship image from The Open Sea stamp set is very suited to a masculine card as is the sentiment which is from the From My Heart stamp set.

Here's what is meant by a gate fold card:

It's the same size as a standard card, just folded a little differently with the ends coming together in the middle, after scoring the 41/4" by 11" Crumb Cake card stock at 2 3/4" and 8 1/4".  The main Very Vanilla image panel was stamped with the ledger image first, stamped off in Crumb Cake.  The the globe stamp was used with full strength Crumb Cake and the ship and sentiment added with Midnight Muse.  I was so happy because the Midnight Muse dried right away and didn't smear at all!  Some linen thread was added to the bottom and a Top Note panel stamped with an anchor was placed inside.


Give the gate fold a try!  It's a way of making a simple card simply terrific!

Avast, landlubbers!  See you tomorrow with something new from Stampin' Up!

Stamps:  The Open Sea (w123030; c123032); From My Heart (w126555; c126557)
Paper:  Crumb Cake (120953), Very Vanilla (101650) and Midnight Muse (126843) card stock; Comfort Cafe DSP (126898)
Ink:  Classic Stampin' Pads in Crumb Cake (126975) and Midnight Muse (126860)
Accessories:  Linen Thread (104199)
Tools:  Top Note Bigz Die (113463); Big Shot (113439)

From My Heart Stamp Set
The Open Sea Stamp Set
Linen Thread