Wednesday, March 31, 2021

Bits and Pieces for a Wednesday


bits and pieces for a wednesday

I'm a bit overwhelmed right now! It's Tuesday night and I'm working on my newsletter. It seems that it comes around faster every month. I've got a spectacular tutorial for it all done, but I'm working on my next class and while it's going to be very exciting, it's not coming together fast enough for this blog post so I'm throwing together some bits and pieces to keep you informed and happy until I can share it with you! 

1. Newsletter Tutorial:

bits and pieces for a wednesday 2

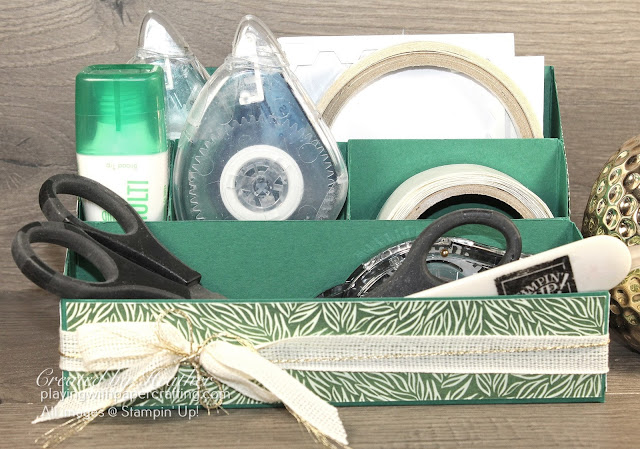
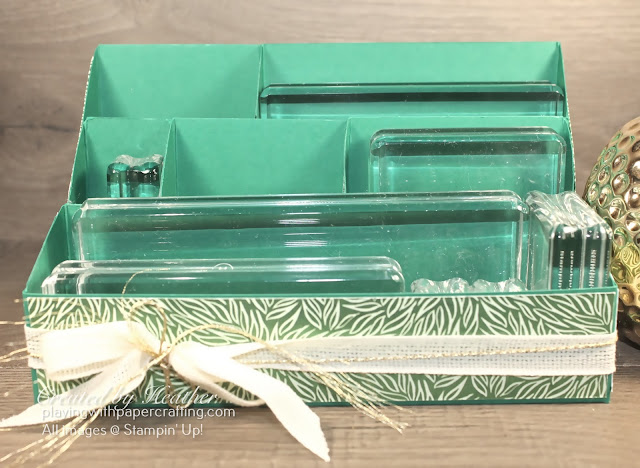
I'm really excited about offering you this free tutorial in my April Newsletter, when I finally get it out! I always have my adhesives and small tools cluttering my work surface, because I don't have a caddy that works for them. I have almost everything else organized but these and so I'm forever hunting for this or that! This caddy has made all the difference and it's not that hard to make. Also it's really sturdy for something put together out of cardstock and DSP! And you can choose your own colours if you want!


bits and pieces for a wednesday 3

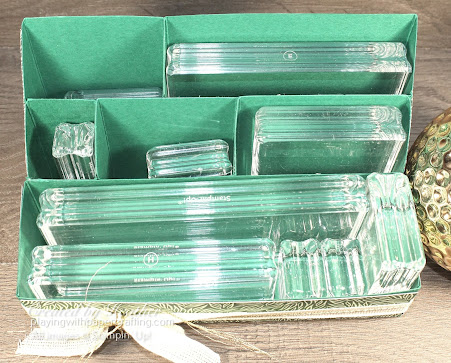
Not only is it perfect for adhesives and scissors and bone folders, I made two and I use one for my clear blocks that I like to keep on hand. The different compartments fit the different sizes of the blocks and keep them well organized, but in reach! And out of the way of sticky adhesive messes!


bits and pieces for a wednesday 4

bits and pieces for a wednesday 5


To be able to get this free photo tutorial, with step-by-step instructions illustrated by photos, you need to subscribe to my once monthly newsletter, which is only updated later in the month if Stampin' Up! comes out with a promotion during the month that I didn't know about at the beginning of the month to include. You are always able to unsubscribe easily from my list as well. To subscribe and get this tutorial, scroll to the bottom of this page and fill in your name and email address and click on submit. That's all there is to it.


annual catalogue cover peek

Look What I Have!!
2. This came in the mail today! So amazing! You'll love it! Save your pennies, quarters, loonies and toonies for this one! Want to see it and order early??

Join my Team and you'll be able to, as one of the best things about being a Demo!

If you would like me to mail one to you, I need to know today, as I have to close my mailing order today!! Contact me!

last chance products promo


3. I've updated the Retiring List to let you know what has sold out already. Just click this link to see the list:


Thanks for tuning in!

If you live in Canada, and don't have a Stampin' Up! demonstrator, I'd love to be yours. I can help you with ideas, get you catalogues and provide you with Stampin' Up products. You can leave a message in the comments or contact me using any of the methods listed in the right side bar at the top of the page. You can shop with me from anywhere in Canada by clicking on the SHOP NOW button in the top menu or clicking on my Online Store.


Monday, March 29, 2021

Alcohol Blend Technique for Monday Morning Live

alcohol blend technique for monday morning live 1

 I tried once before to do the alcohol blend technique on our vellum cardstock and although the technique worked on the Stampin' Blends coloured backgrounds, the alcohol I was using was too low a concentration of alcohol and the vellum ended up rolling up into a scroll no matter what I tried to do to prevent it. So I didn't want to demonstrate the technique on line with that complication. And I wasn't sure I would be able to get the 90% isopropyl alcohol I needed for it here in BC. But my hubby hunted down some 99% isopropyl alcohol, and I crossed my fingers and tried it out, hoping that my theory that at 70%, there was too much water in it and it made the vellum curl, would be correct.

And it worked. I did the technique the same way and the vellum lay as flat as could be and dried just like that! So, I've decided to showcase this alcohol blend technique on my Monday Morning Facebook Live video today at 11 am PDT. I hope you can tune in on my Playing with Papercrafting Facebook page. If not I will post the YouTube replay here on my blog.


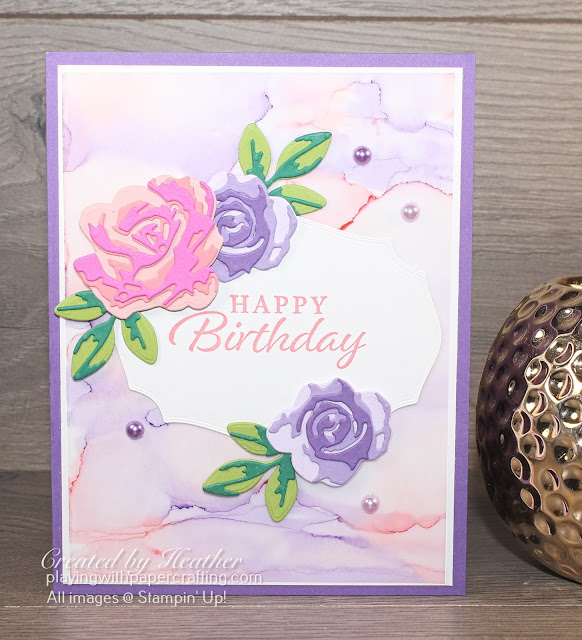
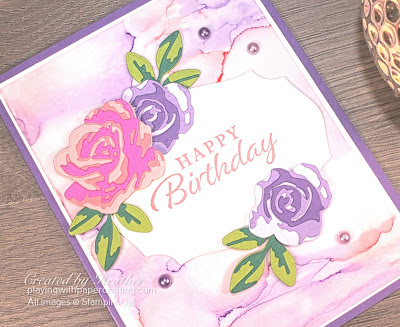
I also tried out, for the first time, my Beautiful Brushstrokes Dies and the Happy Thoughts sentiment stamp set. Here's how the card turned out:

alcohol blend technique for monday morning live 2

  • I used a piece of Gorgeous Grape, 5 1/2" x 8 1/2", scored along the 8 1/2" side at 4 1/4", for the card base. On that I added a piece of Thick Basic White 4" x 5 1/4".
  • I used a full quarter of a sheet of vellum, 5 1/2" x 4 1/4", to try out the technique and then trimmed it down to 5 1/8" x 3 7/8" to layer over the Basic White background. I originally tried it over a Flirty Flamingo background the same size as the Basic White, but the colours were just so intense and the sentiment and roses got lost against it. The white works so much better.
  • You need small scraps of Blushing Bride, Flirty Flamingo and Magenta Madness to create the large flower. No bigger than 2 1/2" square is necessary. The largest rose outline die is cut from the Blushing Bride. The largest of the overlay dies is cut from Flirty Flamingo and the smallest from the Magenta Madness.
  • I cut two purple roses. The scraps of Purple Posy, Highland Heather and Gorgeous Grape should be 1 1/2" x 3 1/2" at the smallest. The largest outline die is cut from Purple Posy, the largest overlay die from Highland Heather and the smallest overlay die from Gorgeous Grape.
  • For the 3 leaves, the outline die is cut from Granny Apple Green and you need a scrap of both shades of green cardstock about 2" x 4". The overlay leaf die is Shaded Spruce.
alcohol blend technique for monday morning live 3

  • The sentiment, from the Happy Thoughts stamp set, is stamped in Flirty Flamingo ink and is die cut with the largest Tasteful Labels Die. You need about a 3" x 4" piece of Basic White cardstock for that.
  • The roses and leaves have their layers glued together and are mounted on the card front, over the sentiment, with glue dots and Stampin' Dimensionals.
  • The embellishments I used are the Pastel Pearls.


april newsletter tutorial 1

How would you like to have a caddy like this to store your adhesives and other small tools that always seem to litter your craft desk and get lost under paper and other products? I'm offering you a free tutorial in how to make this for yourself in my  free April Newsletter if you get it by subscribing. It's surprisingly easy to make, uses only 3 sheets of regular 8 1/2" x 11" cardstock and only about 1/2 of a 12" x 12" sheet of DSP. I've made a couple now, and I'm using another one to hold my clear acrylic stamp blocks in.

april newsletter tutorial 2

It's so handy, because these are the things that clutter up my work surface so easily and now I can keep them organized.

If you would like to subscribe to my newsletter, knowing that you can easily unsubscribe at any time, just scroll to the bottom of the page and enter you email address in the feed and hit subscribe and thank you!

alcohol blend technique for monday morning live 4


If you live in Canada, and don't have a Stampin' Up! demonstrator, I'd love to be yours. I can help you with ideas, get you catalogues and provide you with Stampin' Up products. You can leave a message in the comments or contact me using any of the methods listed in the right side bar at the top of the page. You can shop with me from anywhere in Canada by clicking on the SHOP NOW button in the top menu or clicking on any of products below from my Online Store.

Product List

90% + Isopropyl alcohol

Friday, March 26, 2021

Easter Cards for Grandkids - On the Fly

easter cards for grandkids on the fly 1

 Tuesday was a bit hectic! I needed to finish the birthday card for my husband's birthday the next day, but it was time to mail out the Easter treats for my 6 grandchildren as well. I love how my husband put it: "When you're finished my birthday card, just whip up six cards for the grandkids so we can get their treats mailed out!" Right! How long has he been living with me and my Stampin' Up! business? Long enough to know that you don't just "whip up" six cards.

Well, that's until the Butterfly Bijou Designer Series Paper, which I just found out has been completely sold out! And now I guess I know why! Not only does it have beautiful butterfly images that coordinate with the composite butterfly die, but it also has amazing background papers as well, and in beautiful bright spring colours.

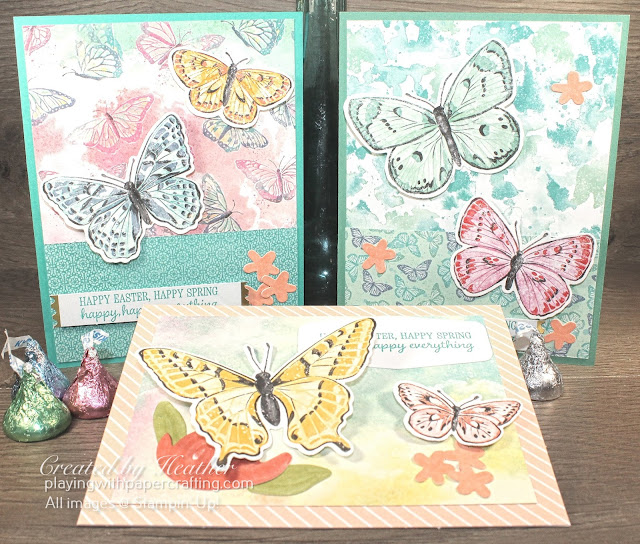
And when I teamed that up with some left over Paper Pumpkin embellishments and a couple of card bases, it turns out that I could just "whip up" 6 Easter cards for the grandkids! Take a closer look at the samples that I made 2 each of:

easter cards for grandkids on the fly 2

  • I have four grandsons and two granddaughters, so the card in the front was the one I used for the girls. The card base is a left over one from an old Paper Pumpkin kit. Don't ask me which one. On it I added the background from the flip side of the large butterfly side, the one where I die cut the butterflies that coordinate with the composite butterflies die. I just trimmed it down to 3 3/4" x 5".
  • The back two cards are for the boys. I made 2 each of those. The background papers you see are all from the Butterfly Bijou DSP.
  • The sentiments are on labels that I found in more old Paper Pumpkin Kits, so no die cutting needed.
  • Let's look at each design separately:
petal pink girls' card

  • I don't think the card base is Petal Pink, I think it might be the old In Colour, Grapefruit Grove, but I love how it looks anyway.
  • The flowers and leaves are stick ons from an old Paper Pumpkin Kit as well.
  • The sentiment label is also from a Paper Pumpkin Kit, but the sentiment is from the Timeless Tulips set.
bermuda bay boys card

  • The background paper is from Butterfly Bijou and the strip at the bottom is its flip side.
  • The flower embellishments are stick ons from that past Paper Pumpkin kit and the label is as well.
  • The sentiment is stamped in Bermuda Bay and is from the Timeless Tulips set.
mint macaron boys card

  • The background paper here again is from the Butterfly Bijou and the strip at the bottom is its flip side again.
  • The flower embellishments and label are, again, from old Paper Pumpkin kits.
  • Same ink and sentiment here as on the other boys' card.
Although I didn't photograph the insides, I used the A Grand Kid stamp set for sentiments before writing in them and mailing them off! Mission completed!

last chance products sale 1

Right now you can save money on products from 2020/21 Annual Catalogue that will be retiring when the new 2021/22 Annual Catalogue comes out at the beginning of May. And some of the savings are significant! Up to 60% off! Follow this link to check out the savings:


easter cards for grandkids on the fly 3


If you live in Canada, and don't have a Stampin' Up! demonstrator, I'd love to be yours. I can help you with ideas, get you catalogues and provide you with Stampin' Up products. You can leave a message in the comments or contact me using any of the methods listed in the right side bar at the top of the page. You can shop with me from anywhere in Canada by clicking on the SHOP NOW button in the top menu or clicking on any of products below from my Online Store.

Product List

Plus leftover card bases, stickers and embellishments from past Paper Pumpkin kits.