Monday, November 30, 2020

A Side Step Card with Peaceful Boughs


side step card with peaceful boughs

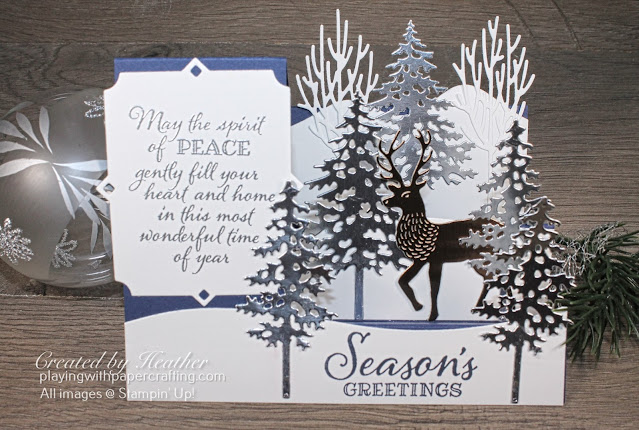
Stampin' Up! has so many beautiful die sets that make trees now that it isn't hard to create a die cut forest of snowy trees to populate a snowy diorama-like display for a Side Step Fancy Fold card. I've been thinking about doing something like this for awhile, and since I got my newsletter finished and posted yesterday, I had a little time today to come up with an interesting design.

I'm planning to recreate this card and show you how to do a side step fancy fold in my Facebook Live session today at 11 am on my Playing with Papercrafting Facebook page. It's been converted into a YouTube video for you here:


Now, take a closer look and I'll list the materials and measurements here:

side step card with peaceful boughs 2

  • To create the card base for this fancy fold Side Step card, I used the following template (cut on the solid lines and score and fold on the dotted lines):
sidestep diagram

  • After scoring and folding the card base I used the curved snow bank dies from the Pine Woods Die set to die cut the snow curves for the steps. I started with Whisper White cardstock with these dimensions:
        5 1/2" x 1 1/4", 3 1/2" x 1 1/2", and 3 1/2" x 2 1/4"
  • The sentiment on the side piece is from Peaceful Boughs and it's embossed in Silver Stampin' Emboss Powder on a piece of Whisper White cardstock that measures 2 3/4" x 3 1/4".
  • The reindeer is die cut from Bronze Brushed Metallic cardstock measuring 2" x 3".
  • The white trees can be die cut with the dies from In the Woods die set on a piece of Whisper White measuring 3 1/2" square.
  • The large evergreen is from the Pine Woods Dies and is die cut from a piece of Silver Foil at least 2 1/4" x 3 1/4". You'll need 2 of those.
  • You'll need 3 smaller evergreens, die cut from Silver Foil pieces at least 2 1/4" x 3 1/4".
  • Then you just have to glue everything on the card base, making sure the edges of the objects do not overextend the edge of the card.
And that's it! Watch for the video later today!

Happy Stampin'

side step card with peaceful boughs 3

If you live in Canada, and don't have a Stampin' Up! demonstrator, I'd love to be yours. I can help you with ideas, get you catalogues and provide you with Stampin' Up products. You can leave a message in the comments or contact me using any of the methods listed in the right side bar at the top of the page. You can shop with me from anywhere in Canada by clicking on the SHOP NOW button in the top menu or clicking on any of products below from my Online Store.

Product List

Friday, November 27, 2020

Heal Your Heart Sale-A-Bration Sneak Peek

heal your heart sneak peek 1

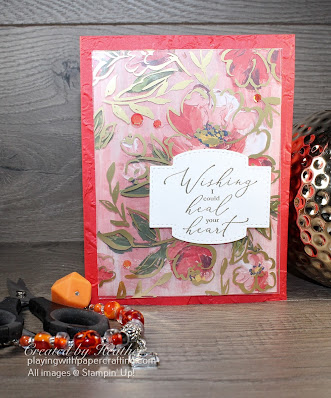
 Without a doubt, there are some beautiful designs coming up in the 2021 Jan/Jun Mini Catalogue! Today I want to give you a sneak peek of a beautiful Designer Series Paper called *Fine Art Floral, a matching acetate overlay called *Golden Garden Designer Specialty Acetate and a stamp set called *Heal Your Heart, that is actually one of the up coming Sale-A-Bration rewards. It has a gorgeous font and several heartfelt sentiments! You're going to love all of them! 

*These products are from the upcoming 2021 Jan/June Mini Catalogue and will be available to order until Jan. 5, 2021.

Let's take a closer look: 

heal your heart sneak peek 2

  • I just love beautiful, artistic Designer Series Paper like *Fine Art Floral. It's a must have for beginner stampers, because it makes you look so good without a lot of effort. And this set is particularly amazing because of the designs, half of which look like real floral oil paintings!
  • One of the designs, which you see in the photo above aligns exactly with a design from the *Golden Garden Designer Specialty Acetate and together they look spectacular!
  • There is a 3D Embossing Folder to go with this suite called the *Painted Texture 3D Embossing Folder and the result of the embossing looks like a gessoed canvas or oil paint brush strokes. I've used it on the Poppy Parade card base front.
  • The beautiful font of the stamp set works perfectly with this suite, even though it's not part of it. It's a set called *Heal the Heart and it's one of the rewards from the new Sale-A-Bration Brochure. Sale-A-Bration begins in January and goes only until the end of February this year, but the good news is that there will be another one in July and August! How awesome is that!!
  • The Stitched So Sweetly Dies were used to die cut the sentiment, which was stamped in Versamark ink and heat embossed with Gold Stampin' Emboss Powder.
  • So, in summary, all you really need to make a beautiful card is some of this gorgeous DSP and an eye-catching sentiment! How easy is that?

*These products are from the upcoming 2021 Jan/June Mini Catalogue and will be available to order until Jan. 5, 2021.
heal your heart sneak peek 3

If you live in Canada, and don't have a Stampin' Up! demonstrator, I'd love to be yours. I can help you with ideas, get you catalogues and provide you with Stampin' Up products. You can leave a message in the comments or contact me using any of the methods listed in the right side bar at the top of the page. You can shop with me from anywhere in Canada by clicking on the SHOP NOW button in the top menu or clicking on any of products below from my Online Store.
*Heal Your Heart cling stamp set, *Fine Art Floral Designer Series Paper, *Golden Garden Designer Specialty Acetate,*Painted Texture 3D Embossing Folder
*These products are from the upcoming 2021 Jan/June Mini Catalogue and will be available to order until Jan. 5, 2021.

Wednesday, November 25, 2020

Pinched Strip Ornaments for December's Newsletter Tutorial


I'm excited to show you some cool little Christmas tree baubles that you can make from designer series paper that have an interesting trick to them, but aren't that hard to make. You could make these by the dozens for your tree and never have to leave your house to buy ornaments. You'd just have to order some Stampin' Up! designer series paper, or better yet, some specialty designer series paper with some metallic foil designs to enhance the holiday feel of them.

I will share the "how to" with you in my free photo tutorial that comes with my December newsletter. If you're not a subscriber to my newsletters, they are also free and are sent to you via email once a month. The photo tutorials that come with each of them have step-by-step instructions for the project they demonstrate, with photos illustrating clearly each step. They also include a list of all materials used and quantities and measurements.

Here's a closer look:


  • With these three baubles, I used paper from both Brightly Gleaming Specialty DSP and Gilded Autumn Specialty DSP, but there are many others that you could use.
  • I got my instructions to start with from Jane from JD Papercrafts.
  • I don't want to give instructions here, as you will find all the details in the photo tutorial.
To sign up for my December tutorial, scroll to the bottom of the page and sign up to be on my mailing list, with the understanding that:
  1. You can unsubscribe easily and quickly, and
  2. I will only send you one, or two at the most, emails a month.

If you live in Canada, and don't have a Stampin' Up! demonstrator, I'd love to be yours. I can help you with ideas, get you catalogues and provide you with Stampin' Up products. You can leave a message in the comments or contact me using any of the methods listed in the right side bar at the top of the page. You can shop with me from anywhere in Canada by clicking on the SHOP NOW button in the top menu or clicking on any of products below from my Online Store.
Product List

Monday, November 23, 2020

Potpourri for a Tag Class

potpourri for a tag class 1

 December is only a week away and our attention shifts from making Christmas cards to wrapping and packaging gifts. There is always a need for tags when you wrap presents and for my December Online Technique Night Class, I thought I would do a class featuring four tag designs. There will be more information on the class in a day or two, but I thought I would pique your interest now with the designs. I've used a whole potpourri of paper, stamp and die sets and Designer Series Papers for this bunch!

potpourri for a tag class 2

  • Starting at the top left, there is the Poinsettia Place Designer Series Paper being used on a Crumb Cake base. Some of the smaller designs are used as background and then the small poinsettias are fussy cut from the DSP and mounted on the tag front. 
  • To get the tag topper, a two-inch strip of cardstock has been cut and punched and mounted between two thicknesses of cardstock for all but one of these tags.
  • In the upper right, a three inch piece of Crumb Cake was embossed with the Evergreen 3D Embossing folder and then the White Craft ink pad swiped across it to highlight the embossing as well as using the snow stamp from the Peaceful Boughs stamp set to add some falling snow.
  • Strips of Plaid Tidings DSP was added top and bottom with the Beautiful Boughs die cuts added.
potpourri for a tag class 3

  • In the bottom left, Basic Black cardstock is the base with some of the black script from the Wonder of the Season Specialty DSP added as background. The sentiment is from Itty Bitty Christmas and it's embossed with Gold Stampin' Emboss Powder and punched out with the Tailored Tag punch. The stars are die cut with the Stitched Stars dies from either Silver Foil Sheets or Brushed Metallic cardstock - Brass.
potpourri for a tag class 4

  • In the bottom right, the tag is made in a different way. The base is die cut with the Stitched Nested Labels in both Balmy Blue and Coastal Cabana. Then the Coastal Cabana is also die cut with So Many Snowflakes label die. 
  • Extra snowflakes were die cut from Balmy Blue, Silver Foil, and Whisper White.
  • The sentiment, from Itty Bitty Christmas, was stamped on Whisper White with Coastal Cabana and die cut with a die from the Stitched So Sweetly set then trimmed down to fit inside the same label die cut from Silver Foil.
  • Some of the Snowflake Adhesive-Backed Embellishments were added.
In all of the designs, the ribbons were some from my stash that seemed to fit.


Starting at 11 pm tonight PST, the 24 hr Merry & Bright Flash Share begins!! Stock up on Christmas gifts for the crafters in your family or for yourself with 10% off almost everything in the 2020/2021 Annual Catalogue. (The exceptions are posted below.) BUT don't wait too long to order. Items can backorder quickly, even sell out! 
If you want me to place your order, get it to me TODAY! If you are ordering online yourself, go through my Online Store, but do it early in the morning so you don't miss out. Click HERE and use the Host Code: ZWTBPBJ6. If the order is over $50 you will get a free gift from me.

Here are the EXCEPTIONS:


potpourri for a tag class 5

If you live in Canada, and don't have a Stampin' Up! demonstrator, I'd love to be yours. I can help you with ideas, get you catalogues and provide you with Stampin' Up products. You can leave a message in the comments or contact me using any of the methods listed in the right side bar at the top of the page. You can shop with me from anywhere in Canada by clicking on the SHOP NOW button in the top menu or clicking on any of products below from my Online Store.

Product List
Paper Snips
[103579]
$13.50