Friday, November 17, 2023

Winter Meadow Suite for As You See It Challenge #312 - The Most Wonderful Time

winter meadow suite for aysi #312 1

 This week at As You See It Challenges, we have a Theme Challenge, created by our lovely Team Member, Joanne, and the theme is Christmas - the most wonderful time of the year. I have been making a lot of Christmas cards lately and I haven't been posting all of them, but this one is my favourite, because it uses my favourite suite from the 2023 Sept/Dec Mini Catalogue, the Winter Meadow Suite. Let me share it with you now. Here's the challenge banner:

challenge #312

So, the only requirement is that the card has to have a Christmas theme, but I wanted to bring out some of the most wonderful things about the season as well. Part of what makes the Winter Meadow suite my favourite is the colours, and I really like those blues and greens and whites as opposed to the traditional reds and greens of the season. Check out my usual Christmas tree decor:

christmas tree

So here are the directions for making my card:

winter meadow suite for aysi #312 2

  • I started with a card base of Basic White Thick cardstock measuring 5" x 10" and scored at 5" so when folded on the score line, gave me a 5" square card front.
  • I added a 4 3/4" square piece of Blueberry Bushel, which, by the way, is such an appealing colour of blue. I used to dismiss it as being too primary, but it really has an undertone of teal in it, which rescues it from that fate!
  • On top of that I added a layer of Basic White, 4 5/8" square, embossed using the Merry Melody 3D EF. Music is a huge part of what I love about Christmas. I have some very particular Christmas favourites including Mary Did You Know by Kathy Mattea, I Heard the Bells On Christmas Day by Casting Crowns, and Enya's Emmanuel. Oh, and I can't forget This Baby by Steven Curtis Chapman.
  • The next layer is a 3 1/2" square of more Blueberry Bushel, and on top of that is a 3 1/4" square of the Winter Meadow DSP.
  • I used a twist of the White 1/2" Iridescent Ribbon under the sentiment which is from the Magical Meadow stamp set, and it's die cut with a die from the Natural Prints Die set.
  • Adhered behind the die are foliage die cuts from the Magical Meadow Die set, in Pretty Peacock, Garden Green and vellum.
This is not a difficult card to make, but does require a square envelope larger than the regular ones SU sells, unfortunately. I was able to find some inexpensive ones on Amazon. If you only need one or two, you could make your own.

last chance promo


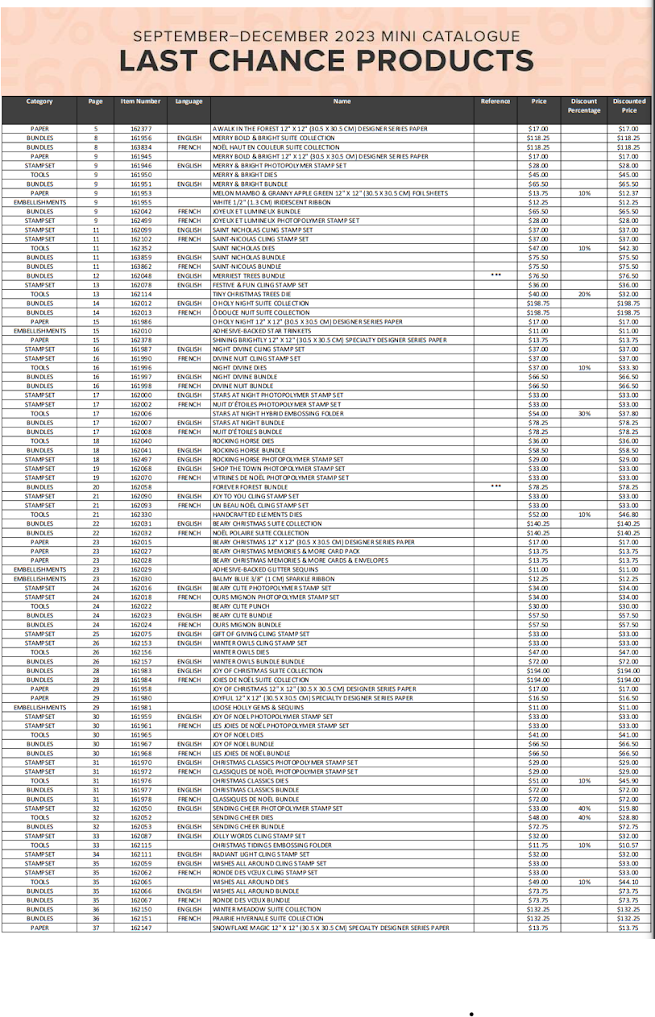
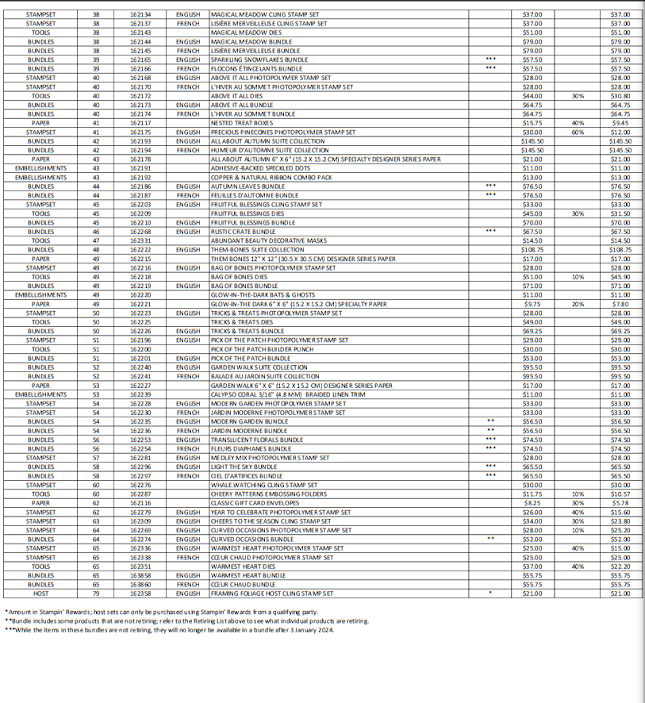
Starting on Tuesday, Nov. 21, you can purchase retiring items from the 2023 Sept/Dec Mini Catalogue with some prices drastically reduced. Check out what's retiring and what's on sale in this document:

last chance items
last chance items 2

winter meadow suite for aysi #312 3


If you live in Canada, and don't have a Stampin' Up! demonstrator, I'd love to be yours. I can help you with ideas, get you catalogues and provide you with Stampin' Up products. You can leave a message in the comments or contact me using any of the methods listed in the right side bar at the top of the page. You can shop with me from anywhere in Canada by clicking on the SHOP NOW button in the top menu or clicking on any of products below from my Online Store.

Product List

Wednesday, November 15, 2023

Tartan Foil Specialty DSP for New at SU

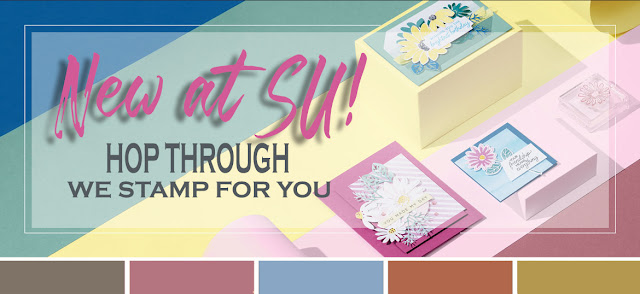
 2023 hop banner
Welcome to our November NEW AT SU! Blog Hop! We love to share creative ideas from Stampin' Up! with you. Today we have projects featuring a ways to dress up Gift Cards and Gift Certificates for the holidays. I'm planning on using the Tartan Foil Specialty DSP from the Online Exclusives Collection and the Joy of Noel bundle from the 2023 Sept./Dec. Mini Catalogue.

I'm old school, I guess. I just feel so wrong giving a naked, lonely gift card. It seems like I didn't put any effort into the gift at all. I know it may be the best option in a lot of cases, but it doesn't sit well with me for some reason. That's why I like to add a little something to the gift when I give someone a gift card. I think it eases my guilt!


tartan foil specialty dsp for new at su 1


The Tartan Foil Specialty Designer Series Paper comes in Copper Clay, Lost Lagoon, and Pebbled Path with two designs of each colour. I used the Copper Clay and Lost Lagoon designs. What you see here is a box with four drawers. Each drawer has enough room for 4 Ferrero Rochers and on top, if you lift the flap of the card, there is room to hold a gift card. See the photo below:


tartan foil specialty dsp for new at su 2

  • First off, I got directions for the box, (which I think is genius) from Jo Blackman, a UK demonstrator. Thanks, Jo, for your great directions. Because we are showcasing ideas for Gift Card upgrades, I added the gift card holder idea on top.
  • The top and bottom of the box have chip board pieces covered with both the Copper Clay and the Lost Lagoon, solid colour tartan designs. I made those first.
  • I made the 4 double walled drawers next from Lost Lagoon cardstock. You can get the instructions from Jo's tutorial video.
  • Each drawer has a wrap made from Copper Clay cardstock, which is a nice snug casing that goes around the four sides, and has a finished edge on the front.
  • With the four drawers in the wraps, they are oriented on the bottom base so that each side has one of the drawers opening on that side. Making sure that they are located equidistant from the edges, they are adhered to the bottom base. Then the top cover is glued on over them.
  • I added DSP and gold foil to the non-opening drawer end on each side, alternating the colours Copper Clay and Lost Lagoon, and using the design with more white in the plaid. The gold foil acts as a matte.

tartan foil specialty dsp for new at su 3

  • The directions for the top cover decor and gift card holder are my added design. The first layer of gold foil is s 5" square and the layer of Copper Clay Tartan Foil DSP is a 4 3/4" square. Then comes a 4 1/4" Gold Foil square.
  • After that you want to cut a piece of Basic White Thick card stock 4" x 8" and score it at 4". Fold it on the score line and center the folded card base on the gold foil and adhere it. Then take a piece of Lost Lagoon Tartan Foil DSP (the white tartan design) that is 4" square and adhere it to the top.
  • Inside, attach a piece of the other design of Lost Lagoon tartan that measures 4" x 1 3/4" at the bottom of the inside as shown, running either adhesive or Tear 'n Tape along the sides and bottom only. Before adhering, use the 3/4" Circle Punch to punch out a half circle finger grip along the top of the paper.
  • I used the Christmas Classics dies to die cut the label and some of the foliage you see. I stamped the Noel from the Joy of Noel bundle in Versamark ink and embossed it in gold embossing powder. I die cut the word using the inside label piece from the Christmas Classics dies and adhered it with dimensionals.
  • The Gold Simply Elegant trim was doubled before tying a bow which is attached with Glue Dots.
tartan foil dsp for new at su 4


I hope you enjoyed this project made with the Joy of Christmas bundle available in the 2023 Sept/Dec Stampin' Up! Mini Catalogue, pages 28 - 31 and the Tartan Foil Specialty Designer Series Paper, found online with the Online Exclusive products.
Please take a moment to comment at the bottom of this post and let me know how you liked my project or ask me a question about the technique used. Don’t forget to scroll back up and keep hoppin’ with us! – Thank you!

tartan foil specialty dsp for new at su 6


Keep Creating!
Heather Cooper

Please contact your Stampin’ Up! demonstrator if you have any questions or to make a product purchase. If you do not have a demonstrator, I would be happy to answer any questions about products, or the techniques shown here. 

Here's the list of bloggers in our New At SU November Blog Hop to help you keep on track:    

Product List
Paper Snips
[103579]
$15.00
3/4" (1.9 Cm) Circle Punch
[119873]
$18.00