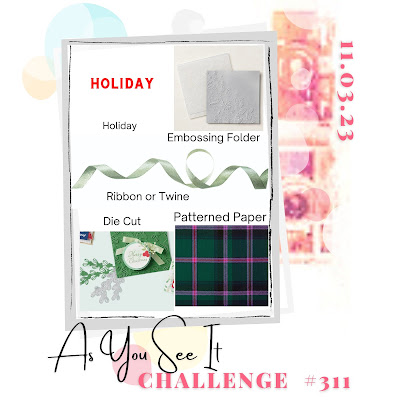
Here are both a cool product and a cool challenge! The product is the Stars at Night Hybrid Embossing Folder, and the challenge is As You See It Challenge #311, a recipe challenge entitled, Recipe for Holiday Spirit! To understand the Recipe challenge, you need to see the Challenge Banner, below:
As concocted by Team Member, Jane, we have to use all the elements shown on the challenge banner, but how we do that is up to us. I wanted to have the front of my card fulfill the requirements of the Challenge, but I wanted to also use the Night Divine Bundle on the inside of my card, so I used a modified Gate Fold for my card base. Take a closer look at both the inside and the outside:
- Score the 4 1/4" x 11" Gray Granite card base at 2 3/4" from each end along the long edge. This gives a 5 1/2" x 4 1/4" center and two 2 3/4" x 4 1/4" flaps, which, when closed, make the finished closed card 5 1/2" x 4 1/4" standard size.
- From the O Holy Night Designer Series Paper (Patterned Paper), I chose the above design and cut a 4" piece from it. To get the right amount of sand and night sky, though, I had to cut off a strip of sand first. I cut that 12" x 4" strip into a 2 1/2" piece, a 5 1/4" piece and another 2 1/2" piece for the inside.
- I ran them all through the Stars at Night Embossing Folder so that just the sky was embossed with the stars. I adhered them all to the inside card base with an 1/8" border all around each piece. For the outside I cut a piece of just night sky design measuring 5 1/4" x 4" and ran that through using the Stars at night embossing folder as well. I made sure that the stars were oriented the correct way.
- I cut down that piece into two pieces, each measuring 2 1/2" x 4" and adhered them to the front panels.
- Using the Stars at Night Hybrid Embossing Folder which involves the addition of a coordinating die inside the embossing folder, I used some of the Antique Distressed Gold Specialty paper and die cut/embossed some stars to create some 3D stars with. I also die cut the next level using Gold Foil. I hand built 2 gold stars by layering these and finishing off with Adhesive Backed Star Trinkets. I added one to the center of the split between the two sides on the front, adhering only on the right side. The other was added to the center panel on the inside.
- I die cut the stable from some old Coredinations cardstock in Early Espresso. I sanded it down so the grain would really show up and made the legs shorter by cutting off the bottom of the legs and mounting it underneath the existing legs. I added the stable to the center panel.
- I die cut the various figures using the Night Divine Dies and added them to the card center and side flaps.
- I heat embossed the two sentiments in gold embossing powder and heat set them. The small one I fussy cut and glued to the card front. The larger one was die cut with the second largest stitched square from Stylish Shapes dies and added to the inside flap left.
- I used Night of Navy & Gold Glittered Ribbon to create a belly band to keep the card closed (and fulfill the challenge criteria) and tied it in a square knot.
- They were completed with small gold Blooming Pearls in the center of a few embossed stars.
If you live in Canada, and don't have a Stampin' Up! demonstrator, I'd love to be yours. I can help you with ideas, get you catalogues and provide you with Stampin' Up products. You can leave a message in the comments or contact me using any of the methods listed in the right side bar at the top of the page. You can shop with me from anywhere in Canada by clicking on the SHOP NOW button in the top menu or clicking on any of products below from my Online Store.

.jpg)

.jpg)
.jpg)
.jpg)
.jpg)
.jpg)
.jpg)


So beautiful, Heather - I am loving this suite so much, and I love the gorgeous gatefold you created! Such a fabulous way to get more of the goodies in, lol, and so cool for our recipe! I'm off to try embossing that DSP now, lol...
ReplyDeleteThanks so much, Heather. I did the inside first and loved it! Not quite as happy with the front, but couldn't redo without wrecking the inside so??
DeleteOh my, what a fabulous creation! It's like a little storybook of the first Christmas. What a way to use that recipe!
ReplyDeleteThanks, Jan! It was fun to do!
ReplyDeleteI love this card. I think it is clever to use the set in a gatefold and I love the ribbon. It is so sparkly.
ReplyDeleteThank you, Johanna! I had already planned the inside when this challenge was nearing, and I only had to add a couple of elements to the front to fulfill all the requirements!
DeleteWow! Is about all I can say! I have been seeing this stamp set all over the place and love what you did with it. But the real surprise is the inside. Someone will be very lucky to get this card! PS - that ribbon is lush!
ReplyDeleteThanks, Jane! I love that ribbon, too!
DeleteOh wow, Heather - that's absolutely fabulous!
ReplyDeleteHeather this is a truly fabulous card! The embossed DSP and outside is lovely, then the inside reveal is just first class - the story of Christmas laid out in all its glory. Just beautiful!
ReplyDelete