Friday, July 29, 2022

A New Design for a Christmas Gift Set for As You See It Challenge #280

a new design for a christmas set for aysi #280 1

 Every Christmas, I have a favourite project I like to create several of. It's a Christmas Stationery Gift set and it makes a great gift or a great craft fair novelty. The first time I ever made one was in 2018 and I followed the directions on a blog post and video tutorial by SallyStampers. Since then, many of the original materials and stamp sets have been retired, so I've reinvented them each year.

This year I've used sentiments, paper and glimmer paper from the Lights Aglow Suite in the 2022 Jul/Dec Mini Catalogue. This is a gorgeous suite that I'm sure most of you will love! You might want to check it out! I've also used the Eden's Garden stamp set and the Merriest Moments stamp set for the foliage stamps.

As You See It Challenge #280 has a Fill in the Blank Challenge this week. Check it out: 

challenge #280


I would fill in the blank like this: My favourite Christmas in July creation is a Christmas Stationery Gift Set.

Here are some more photos with all the details:

a new design for a christmas gift set for aysi #280 2


The outside flap of the gift set. I used the Lights Aglow Specialty 6" x 6" DSP for the backing of the sentiment and the Glimmer Specialty Paper for the sprigs.


a new design for a christmas set for aysi #280 1
Contains four gift tags, four 3"x3" thank you cards with envelopes, and four 51/2"
x 4 1/4" Christmas cards with envelopes.

a new design for a christmas set for aysi #280 3


This view give a closer look at the cards and tags and their designs. Don't you just love the Lights Aglow Specialty 6" x 6" DSP on the large cards?


large cards

  • These are fairly simple to make but the use of the Lights Aglow Specialty 6" x 6" DSP and the Glimmer 12" x 12" Specialty Paper for the sprigs around the sentiments really makes them look special.
  • The sentiment from the Brightest Glow stamp set is embossed in gold on Basic White and die cut with a Seasonal Labels die. The sprigs are punched using the Bough Punch.
mini cards

  • These 3" x 3" cards are created from Basic White cardstock cut at 6" x 3" and scored at 3".
  • The sentiment from the Hello Harvest stamp set is embossed in gold. The foliage is stamped in Cherry Cobbler, Evening Evergreen and Soft Succulent and the stamps are from the Merriest Moments stamp set.
  • These are meant to be Thank You cards for Christmas presents received.
gift tags

  • This set of 4 gift tags uses the retired Delightful Tag Topper Punch for the top. They are made from Thick Basic White Cardstock cut at 2" x 4". 
  • The gold Glimmer Specialty paper is 2" x 0.5". 
  • The paint stroke is from the Hydrangea Haven stamp set, and is stamped off once before stamping, using Soft Succulent ink.
  • The foliage is stamped in Evening Evergreen and is from Eden's Garden, while the sentiment, joy, comes from the Brightest Glow stamp set and is stamped in Cherry Cobbler ink.
  • The ribbon is Gold 1/4" Shimmer Ribbon.
I hope you enjoyed this project. It always gets rave reviews from all the recipients or shoppers at craft fairs!

christmas stationery gift set

If you live in Canada, and don't have a Stampin' Up! demonstrator,  I'd love to be yours. I can help you with ideas, get you catalogues and provide you with Stampin' Up products. You can leave a message in the comments or contact me using any of the methods listed in the right side bar at the top of the page. You can shop with me from anywhere in Canada by clicking on the SHOP NOW button in the top menu or clicking on any of products below from my Online Store.

Product List
1-3/4" (4.4 Cm) Circle Punch
[119850]
$24.00
Bough Punch
[157711]
$26.00

Saturday, July 16, 2022

Cottage Rose Paper Tole Get Well for Freshly Made Sketches

cottage rose paper tole get well for fms 544 1

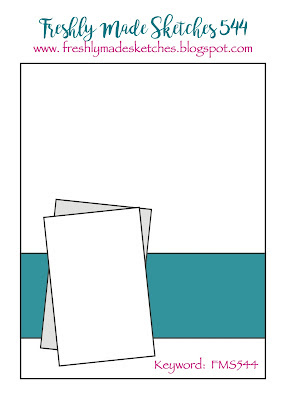
I'm so excited to play with the Freshly Made Sketches gang again! It's been so long! And they have such an intriguing sketch this week that caught my eye. Take a look:

fms #544
Isn't that unique? Anyway, I don't know if it was the sketch or a design team sample that inspired me, but I decided to go vintage and got out my Abigail Rose Suite from the Annual Catalogue! I needed a get well card for a friend who has just had surgery and the Cottage Rose stamp set has a nice "feel better" sentiment with it as well as those lovely wild roses. Here's my fully distressed and antiqued design:

cottage rose paper tole get well for fms 544 2

  • I took a piece of the Abigail Rose Designer Series Paper and distressed it using a bone folder, distressing tool from long ago, and a blending brush to add some Soft Suede ink to the edges to give it that vintage look. I mounted it on a layer of Early Espresso to back it and added a piece of the Natural Finish Ribbon and then adhered it on a card base of Petal Pink cardstock. 
  • I used 2 different designs of the Abigail Rose DSP for the 2 small panels from the sketch, distressing each of them a little and mounting them over the ribbon at different angles, as per the sketch.
  • With Gray Granite ink, I stamped the medium sized rose from the stamp set 3 times and coloured it in using the Petal Pink Stampin' Blends Combo. This flower has 3 layers of petals. I fussy cut out the top layer on one flower, the top two layers on the second flower and the whole flower on the third.
  • Using the large stylus end of the Take Your Pick Tool and the Stampin' Pierce Mat, I gently embossed the petals of each layer of petals depending on whether they would be curving outward or inward. Then I assembled the flower as in paper tole, using Mini Stampin' Dimensionals, layering the pieces largest to smallest, matching lines.
  • I stamped the leaves in Gray Granite and coloured them in using the Gray Granite Stampin' Blends Combo, then fussy cut them and adhered them to the small panels as shown with Glue Dots. I die cut some extra sprigs from the Vellum Layering Designs using the Natural Prints dies and secured them over the leaves using Glue Dots.
  • I finally added the paper tole rose, also using Glue Dots.
  • The sentiment was stamped in Early Espresso and die cut with one of the Stylish Shapes dies. It was also added with a glue dot and curved up at one end using the bone folder. 
july paper pumpkin

This was the result of July's Paper Pumpkin kit. I was so excited to get the kit yesterday and I put the cards together last night! I didn't change much except the sentiment in some cases because they are so perfect for my taste! (You know I love the ocean and beachy stuff!) There's another beautiful one coming in August involving sunflowers! You should really get on it! Subscribe by August 10th to get it, but it looks like it will be well worth it. (PS It's easy to unsubscribe or pause your subscription, unlike some things you subscribe to!) Check this out:

august paper pumpkin 1

august paper pumpkin 2

august paper pumpkin 3

To subscribe, click HERE.


cottage rose paper tole get well for fms 544 3

If you live in Canada, and don't have a Stampin' Up! demonstrator,  I'd love to be yours. I can help you with ideas, get you catalogues and provide you with Stampin' Up products. You can leave a message in the comments or contact me using any of the methods listed in the right side bar at the top of the page. You can shop with me from anywhere in Canada by clicking on the SHOP NOW button in the top menu or clicking on any of products below from my Online Store.

Product List
Stampin' Distress Tool
*Stampin' Distress Tool
[127562]
$6.95
Paper Snips
[103579]
$15.00

*Retired product, no longer sold by Stampin' Up!