Thursday, March 31, 2016

A Nice Cuppa Suite Part Two and Last Day of Sale-A-Bration!


TODAY IS THE LAST DAY TO WIN SALE-A-BRATION REWARDS!


Don't miss out on the free products! My last order will be going in around 8 pm. Historically, Sale-A-Bration rewards do not carry over into the Annual catalogue and will be gone for good! I don't want you to come to me with sad puppy dog eyes when you find out that you've missed the deadline!  You can phone or email me your order, but make sure I get it before 7 pm tonight! Remember that your order needs to be $60 before tax and shipping to earn a reward. Here's a link to the Sale-A-Bration Brochures One & Two. (Note: the Glitter Tape is now sold out) You can also shop at my On-Line Store any time up to 11:00 pm to still be eligible.


Yesterday, I promised you a full version of the A Nice Cuppa greeting card holder and cards suite. I am delivering today! This is a tutorial that you will get for free for being on my newsletter list. It consists of a detailed step-by-step photo tutorial for the greeting card holder, made using the Envelope Punch Board, including supplies used and measurements, plus a bonus measurement and supply list for each of the eight cards that go with it.


To get this free tutorial, all you need to do is to be on my email newsletter list. If you would like to subscribe to it, simply add your email below and click on Go!


Join My Mailing List
Email:


For Email Marketing you can trust


Here is a closer look at the eight cards that you will receive a list of supplies and measurements for:


Wednesday, March 30, 2016

Card Package Tutorial with A Nice Cuppa Suite


I'm not a big tea drinker, but I find myself charmed by the notion of it and so I just love my A Nice Cuppa bundle from the Occasions catalogue! I've been trying to come up with a suite of products for my free newsletter tutorial, and I decided that this bundle would be the theme.

After cleaning up from the weekend visit by two of our three daughters and their families, which included four children four and under, I found myself a titch low on energy. I was hoping to be able to complete the whole suite by blog time, but photographing each step took a bit longer and I completed only the card holder. Tomorrow, I will showcase the cards to go with it so stick with me til then.

This holder is made using an easy technique with the Envelope Punch Board, which I will share with my newsletter subscribers. It is large enough to hold approximately 8 standard sized greeting cards. If you'd like to sign up to receive my newsletter, just add your email to the spot below and click on Go. You'll receive a detailed, step-by-step photo tutorial which includes supplies and measurements with this month's newsletter.


Join My Mailing List
Email:


For Email Marketing you can trust

You will be able to unsubscribe at any time you choose and I usually send only one email a month, unless there is a big sale or announcement from Stampin' Up! that I feel my customers would want to know about.

Here's a closer look at the card holder:


Tuesday, March 29, 2016

The Countdown is On!


Time is ticking on! Three more days of Sale-A-Bration 2016. Three more days to earn free rewards with every $60 you spend. Three more days to join Stampin' Up! and get an extra $40 in products of your choice. Normally, you spent $125 and get $155 in products, but during Sale-A-Bration, you pay $125 and you get $195 worth any current product you want! You have nothing to lose. You don't need to have an inventory. Even if you do nothing else you'll get 4 months of  20% discounts from Stampin' Up! before you have to make a minimum! Why wouldn't you take advantage of it?

Here are the Sale-A-Bration Rewards you can still access for the next 3 days:

Don't forget that you will also earn an invitation to my exclusive Celebrate Sale-A-Bration if you have earned even one SAB reward!

Here are some projects using several of these SAB products:


Wildflower Fields DSP and Flowering Fields Stamp Set.


Honeycomb Happiness Stamp Set

                                                                                   Party Pants Stamp Set and Metallic Glitter Tape


Wildflower Fields DSP


We are also heading into April and toward the end of the month we will get a list of products that will be retiring from both the 2015/16 Annual Catalogue and the 2016 Occasions Catalogue. Once that list comes out, many of the retiring products will only be available as supplies last and some items go very quickly. The fastest to sell out, sometimes within the first day or two, are the 2014-2016 In Colour Products which will be retiring for sure, unless Stampin' Up! does a colour refresh. Here are the products that will sell out quickly:


My advice to you is to stock up on these products before the retiring list comes out and while the supply is still plentiful.

Finally, today is Tuesday and there is a new set of Weekly Deals:


Monday, March 28, 2016

Shaving Cream Easter Egg Technique


Well, I hope you had a Happy Easter! Our house was a little chaotic, with four children ages 4 and under, but we had lots of fun and grandbaby cuddles this weekend. We launched rockets, went for walks, played Lego, ate great meals, and celebrated Gramps' birthday!

And one thing we did was decorate Easter Eggs! We used the shaving cream technique, which I have used on card backgrounds before to get a marbling effect. It really works on Easter Eggs, too!

First you want to either hard-boil a dozen eggs or tap a hole in each end with a meat skewer or large needle and blow out the contents so you just have a shell. I did that and, believe me, I was feeling slightly light-headed when I was finished 12 of them!

Then you fill a glass cake dish with foam shaving cream. (Gel shaving cream doesn't work and glass dish because it doesn't stain.

Then you drip several different colours of food colouring or ink refills on the shaving cream and stir it with a toothpick to marbleize it:


This is Parker helping to marbleize the shaving cream.

Then you roll an egg through the foam until it's covered, and wipe off the shaving cream with a paper towel. It leaves behind the marbled pattern on the shell.


I used the Tin of Cards Project Kit tin to display them, adorned with some Mint Macaron Dotted Lace Trim.

Here are some more photos of the grandkids:


The two oldest grandpups, Kesten and Parker,  being super silly and fun!


Little Cedar, my only granddaughter, having some cuddle time with her mommy, Kristen, while helping to dye the eggs.


Jackson couldn't really help much, but he just sat there and looked adorable while we worked!


Give it a try with your little ones! Be prepared, though for multicoloured fingers when you're done!

Thanks for stopping by!

Friday, March 25, 2016

Flowering Fields for As You See It Challenges


Could it be Friday already? I can't believe that! We're already into our Easter celebrations here with one set of kids already here and one set on the way! I think we're going to decorate eggs tomorrow using the shaving cream technique! Yes, the same as you would do with a card background! I'll take some pictures to show you on Monday!

But Friday means another new challenge for us over at As You See It Challenges today:


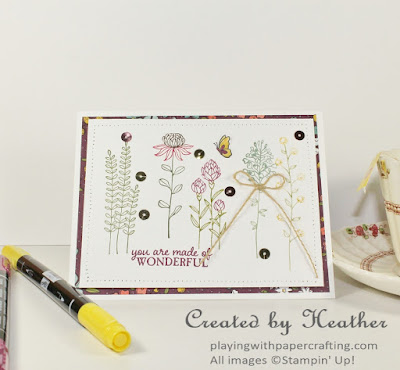
It threw me a little because we no longer have a feather stamp set. (Insert pout and sigh!) And I struggled to think what I could use that was narrow enough to fit five of on the card front. Then, I had a happy thought - Flowering Fields stamp set, one of the current Sale-A-Bration rewards! The plants in that set are tall and skinny, perfect for the job! And because there is only a week left of Sale-A-Bration, it would be a good time to feature one of the great items you can earn for every $60 you order!


  • I love these images! It's one of my favourite Sale-A-Bration sets this year. The great part is, that because these are all line images without solid centers, they are perfect for inking up with Stampin' Write Markers, so no need to mask and match with the Stamp-a-ma-jig to get different colours on the flowers and stems.
  • I added a sentiment from the Picture Perfect stamp set in Rich Razzleberry. I think it was made for this card, don't you?
  • I sewed, without thread in the needle, with my sewing machine to get the paper piercing on the front panel. Much easier than using the paper piercing guides, if you ask me.
  • The background DSP is from the Wildflower Fields set, also a SAB reward only available for another week! Don't forget to earn those rewards that you just have to have before the week is up. March 31 is the last day! Here's a quick summary of what you can earn:


I'm so happy we got to visit today! Leave me comment to tell me which SAB rewards you have earned so far!


Click on the links below to take you to my On-Line Store, where you can read about, look at, and purchase if you wish, the products used to make this card today.


Product List