Friday, October 30, 2020

November's Newsletter Tutorial with Classic Christmas Designer Series Paper


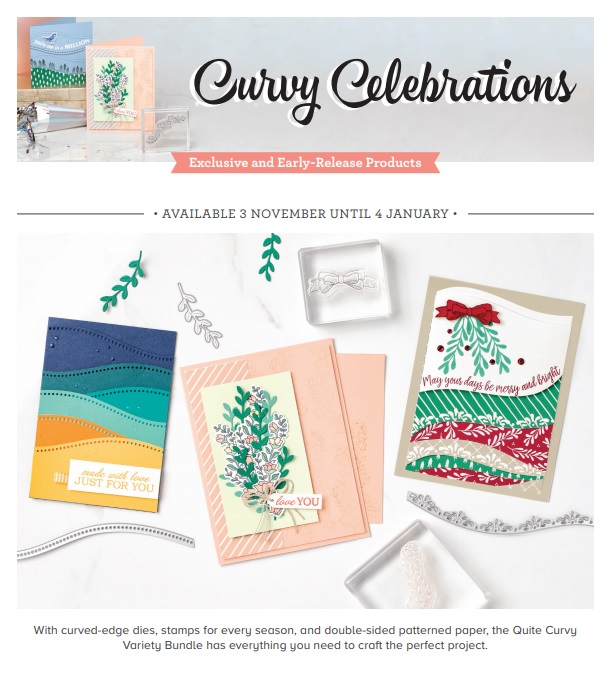
Well, I'm officially in love with the Curvy Celebrations Suite, which is why my free newsletter photo tutorial for November is featuring both the Curvy Dies and the Classic Christmas Designer Series Paper, both part of that suite! And you will be able to purchase them this coming Tues., Nov. 3! How exciting is that!

This Suite is both an Early Release Promotion and an Exclusive Limited Availability Promotion all in one. The Quite Curvy stamp set and the Curvy dies are an Early Release from the upcoming Jan/Jun Mini Catalogue, opening for sales starting Jan. 5, 2021. The Curvy Christmas stamp set and the Classic Christmas 6x6 DSP will only be available for sale from Nov. 3 until Jan. 4 and then they are gone for good! So the only way you can get them is to buy them at this time! 

Let's take a closer look at the subject of my newsletter tutorial:


  • This design also makes good use of the Brushed Metallic Gold Cardstock and the For Unto Us Cling stamp set.
  • The Curvy Dies cut the Classic Christmas DSP into curves to add to the card front.
  • The For Unto Us stamp set supplied the sentiment that was embossed with Gold Stampin' Emboss Powder onto a stitched circle die cut with the Stitched Shapes dies.
My photo tutorials are free to subscribers of my free monthly newsletters, and are step-by-step instructions, illustrated with photos of each step, and complete with a list of products used and measurements. 
To subscribe to my monthly newsletter, simply enter your email address in the field in the right bar menu or at the bottom of this page and hit Submit.

Meanwhile you only have two more days to take advantage of the Designer Series Paper Sale, which is over on Saturday, Oct. 31st! Here are the details:


Don't miss out on this! Stock up for Christmas and beyond!


If you live in Canada, and don't have a Stampin' Up! demonstrator, I'd love to be yours. I can help you with ideas, get you catalogues and provide you with Stampin' Up products. You can leave a message in the comments or contact me using any of the methods listed in the right side bar at the top of the page. You can shop with me from anywhere in Canada by clicking on the SHOP NOW button in the top menu or clicking on any of products below from my Online Store.

Product List
Sprig Punch
[148012]
$24.00

*Classic Christmas 6 x 6 DSP, * Curvy Dies
*Products from the Curvy Celebrations Promotion, available Nov. 3, 2020.

Wednesday, October 28, 2020

Coming Home Lumiere

coming home lumiere 1

I've had an idea for a couple of days, but wasn't quite sure how to work out the details. I just had to experiment, it turns out. The idea was to make a slimline card with the Coming Home bundle, but then somehow cut out the windows and replace them with Window Sheets and put the battery powered votive candles or some other light source behind them and let them glow. I thought it would look really cozy. But I had to think about how to successfully cut out the windows and get the window sheets in there nicely.

After I figured it out, (it would have been a lot easier if my exacto knife had been sharp), I added the candles and this is what it looked like:


With the lights on, it still looks nice, thanks to the Coming Home stamp set and coordinating Home Together Dies:

coming home lumiere 2


  • What I did to make it work was to make the base out of Whisper White Thick Cardstock and I stamped the buildings, trees, car and the lampposts  on the base with Memento Tuxedo Black ink. I started trying to carefully cut out the windows with a craft knife on the card base, but it was far too difficult because of the small size and the thick cardstock. So I decided to just roughly cut out the areas of the windows, using Paper Snips.
  • Then I stamped the houses and lampstands again on regular cardstock and tried again to cut out the details of the windows carefully, but without success. I finally decided to just cut out the main large rectangles for the windows and stamp the cross pieces on the Window Sheets, gluing them behind the regular cardstock versions of the houses. I would then glue them onto the corresponding houses already stamped on the card base and the Window Sheets would be glued between them.
  • I stamped the houses once more on the window sheets with StazOn Jet Black ink, which is permanent, and then adding some Stampin' Right Marker  in Daffodil Delight on the back side to give it a yellow glow. I dried the ink before gluing it on.
  • I coloured the finished houses in with Stampin' Blends Marker Combos in Poppy Parade, Pool Party, Misty Moonlight, Old Olive, and Soft Suede. I added some Crushed Curry to windows that hadn't been cut out.
curvy celebrations 1

I have been having a blast with the Curvy Celebrations Suite products and soon you will be able to purchase them as well. Tuesday, November 3 is the date and, if you get this suite now, rather than waiting until the Jan/Jun Mini Catalogue comes out in January, you will be able to get a couple of Christmas products that won't be available then: The Curvy Christmas stamp set and the Classic Christmas 6 x 6 Designer Series Paper. Take a close look and you might also want to check out my Pinterest board of samples HERE.

curvy celebrations 2

curvy celebrations 3

coming home Lumiere 3

If you live in Canada, and don't have a Stampin' Up! demonstrator, I'd love to be yours. I can help you with ideas, get you catalogues and provide you with Stampin' Up products. You can leave a message in the comments or contact me using any of the methods listed in the right side bar at the top of the page. You can shop with me from anywhere in Canada by clicking on the SHOP NOW button in the top menu or clicking on any of products below from my Online Store.

Product List
Paper Snips
[103579]
$13.50