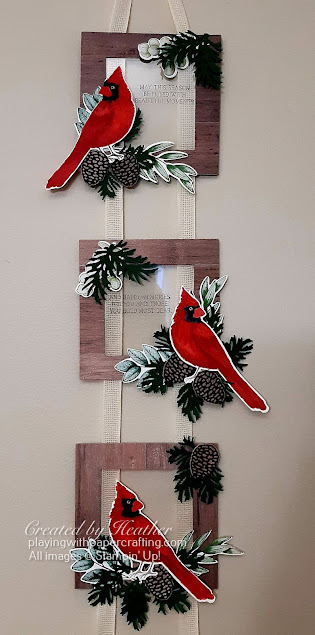
I've been looking for ideas for Christmas decor and packaging lately for an event I'm holding on Facebook and I came across a beautiful project done by Gail Ellis of Blue Rose Paper Treasures that she had created as a piece of spring decor. I believe she originally got the idea from Jacque Williams of Stamp Happy. I immediately thought it would also make a great base for a Christmas design and got out my Toile Christmas stamp set along with the coordinating Christmas Cardinal dies.
To make extra foliage I also made use of the Forever Fern Bundle and the Beautiful Boughs dies. Here's a close up of the whole project:
- The frames were cut from 2 pieces of 4" square cardboard from the backing board that comes inside all our DSP packages or Specialty Papers. These had a square die cut in the center using the Layering Squares Dies.
- I then die cut the same square from the center of a 4" square piece of the In Good Taste Designer Series Paper.
- You need 3 3/4" Window sheet squares. The top two will have the sentiment from Toile Christmas stamped on them in StazOn ink, but you will need to add all the birds and foliage to the front of the top frames first so you will know where to stamp the sentiment on the window sheet to avoid them.
- I stamped the cardinals in Sahara Sand on Whisper White, then used Basic Black, Poppy Parade, Crumb Cake, and So Saffron Stampin' Blends Combos to colour them in. I did that three times. Then I used a clear acrylic sheet and stamped the image on it in Sahara Sand and turned over one of the coloured images. Because the Stampin' Blends bleed through to the back of the cardstock, I could see the location of the cardinal on the front from the back, but it was reversed. I stamped the image over the image that bled through on the back to get the reversed image lines, then coloured it in again.
- I used Garden Green, Shaded Spruce and Mossy Meadow to stamp the foliage and the Forever Flourish dies to die cut it.
- I used Shaded Spruce card stock and the Beautiful Boughs dies to cut the fir boughs.
- These were arranged on the front of the frames as shown and adhered with Glue Dots and Stampin' Dimensionals.
- I used Stampin' Seal+ on the back of the frame and attached the window sheet, making sure that the sentiment was straight and unimpeded by foliage. I added more adhesive to that and added the back of the frame, making sure all edges lined up.
- I used the Vanilla Open Weave Ribbon from the Forever Greenery Trim Combo pack for the ribbon to use as both the hanger and attachment for each frame. I just cut a long piece and doubled it, then added Stampin' Seal+ just inside the frame edges on both sides for each frame and stuck them to the ribbon, as you can see above.
Happy Thanksgiving to all my Canadian and UK readers! Thanks for your loyalty over the years! I'm thankful for you! Hope the turkey is delicious! (If you're having turkey!)
If you live in Canada, and don't have a Stampin' Up! demonstrator, I'd love to be yours. I can help you with ideas, get you catalogues and provide you with Stampin' Up products. You can leave a message in the comments or contact me using any of the methods listed in the right side bar at the top of the page. You can shop with me from anywhere in Canada by clicking on the SHOP NOW button in the top menu or clicking on any of products below from my Online Store.


No comments :
Post a Comment
I love to read your comments and get to know you better! Thanks for adding one!