Showing posts with label Side Step Fold. Show all posts

Monday, November 30, 2020

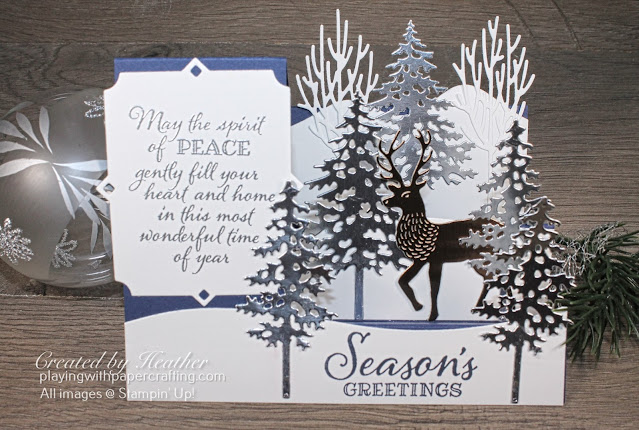
A Side Step Card with Peaceful Boughs


side step card with peaceful boughs

Stampin' Up! has so many beautiful die sets that make trees now that it isn't hard to create a die cut forest of snowy trees to populate a snowy diorama-like display for a Side Step Fancy Fold card. I've been thinking about doing something like this for awhile, and since I got my newsletter finished and posted yesterday, I had a little time today to come up with an interesting design.

I'm planning to recreate this card and show you how to do a side step fancy fold in my Facebook Live session today at 11 am on my Playing with Papercrafting Facebook page. It's been converted into a YouTube video for you here:


Now, take a closer look and I'll list the materials and measurements here:

side step card with peaceful boughs 2

  • To create the card base for this fancy fold Side Step card, I used the following template (cut on the solid lines and score and fold on the dotted lines):
sidestep diagram

  • After scoring and folding the card base I used the curved snow bank dies from the Pine Woods Die set to die cut the snow curves for the steps. I started with Whisper White cardstock with these dimensions:
        5 1/2" x 1 1/4", 3 1/2" x 1 1/2", and 3 1/2" x 2 1/4"
  • The sentiment on the side piece is from Peaceful Boughs and it's embossed in Silver Stampin' Emboss Powder on a piece of Whisper White cardstock that measures 2 3/4" x 3 1/4".
  • The reindeer is die cut from Bronze Brushed Metallic cardstock measuring 2" x 3".
  • The white trees can be die cut with the dies from In the Woods die set on a piece of Whisper White measuring 3 1/2" square.
  • The large evergreen is from the Pine Woods Dies and is die cut from a piece of Silver Foil at least 2 1/4" x 3 1/4". You'll need 2 of those.
  • You'll need 3 smaller evergreens, die cut from Silver Foil pieces at least 2 1/4" x 3 1/4".
  • Then you just have to glue everything on the card base, making sure the edges of the objects do not overextend the edge of the card.
And that's it! Watch for the video later today!

Happy Stampin'

side step card with peaceful boughs 3

If you live in Canada, and don't have a Stampin' Up! demonstrator, I'd love to be yours. I can help you with ideas, get you catalogues and provide you with Stampin' Up products. You can leave a message in the comments or contact me using any of the methods listed in the right side bar at the top of the page. You can shop with me from anywhere in Canada by clicking on the SHOP NOW button in the top menu or clicking on any of products below from my Online Store.

Product List

Wednesday, November 5, 2014

Holiday Homes in a Side-Step Card and Memory Keeping with Project Life


My theme for Technique Nights this month is Fun Folds for Christmas, and I have never taught my gang how to make a side-step card, so this is the month they will learn!  I shamelessly cased this card from a similar design by Janine Tinklenberg, or Jan Tink as she is more commonly known, If you don't follow her blog, you should!  She is a true artist, but one with a wild sense of humour!  You'll love reading her posts!  She found a great tutorial on how to make a side step card on Splitcoast Stampers, and I used the measurements they gave and it turned out perfectly!


  • The Holiday Home stamp set is a natural for this fun fold, as you can create a little 3D village using the three graduated steps at the side.  I embossed each of the 3 house designs in White Stampin' Emboss Powder twice on Lost Lagoon, Pear Pizzazz and Smoky Slate cardstock and carefully die cut them using the Homemade Holiday Framelits.
  • I used Dazzling Diamonds Glimmer Paper for the snow banks, hand cutting the hills in each piece.  It is so perfect for snow!
  • The DSP on the left side is from All is Calm Specialty Designer Series Paper. It makes a great looking snowfall.
  • The little accessories on the card, including Santa's sleigh, the snowman, the trees, the Christmas lights and the wreaths are all stamps from the Holiday Homes stamp set. Some were stamped right on the houses, but most were stamped on Whisper White cardstock and hand snipped with Paper Snips. I really need a 1/8" Circle Punch, but I don't have one.  I missed that Weekly Deal by a day!  Instead, I punched out the middle of the wreaths using the eyes from the Owl Builder Punch. It would be easier, I think, to punch the holes first and stamp the wreath around them and hand cut it.


  • The sentiment is from the Wondrous Wreath stamp set and die cut using the Deco Labels Framelits. It was stamped in Real Red and Santa's sleigh is added in Memento Tuxedo Black, before die cutting.  Just keep the sleigh fairly close to the text.
Here's a side view so you can see how the houses are attached and how the folds are created:


This card can fit into a standard envelope, with a bit of a squeeze due to the label.  It could be moved over to the right if necessary.

Give the Side Step fold a try.  It makes for a pretty impressive looking greeting card.

I wanted to share a couple of videos from Stampin' Up! regarding Project Life by Stampin' Up! because I am offering my first ever Memory Keeping Made Easy class on Tuesday, November 18. But in order to attend, you will need to preorder some pocket pages and Project Life Cards along with some optional accessories, by Friday, Nov. 7. Follow this link to register and prepay so I can order your choice of supplies in time for the class.

The first video details the Hello December kit from the Holiday Supplement:


The second is more information about Project Life:


Click on the links below to take you to my On-Line Store, where you can read about, look at, and purchase if you wish, the products used to make this card today!


Product List
Pear Pizzazz 8-1/2" x 11"" Card Stock"
[119795]