Showing posts with label In the Woods dies. Show all posts

Monday, November 30, 2020

A Side Step Card with Peaceful Boughs


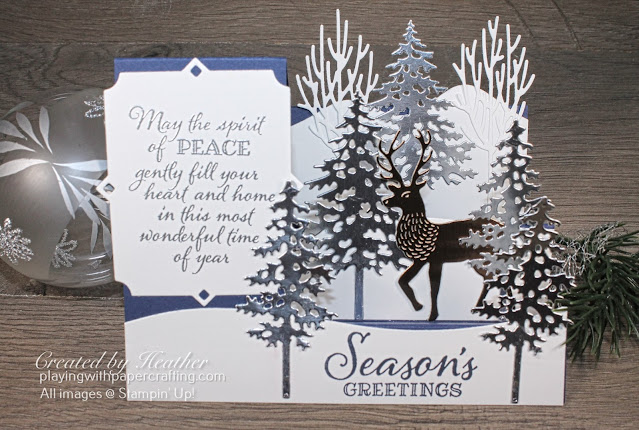
side step card with peaceful boughs

Stampin' Up! has so many beautiful die sets that make trees now that it isn't hard to create a die cut forest of snowy trees to populate a snowy diorama-like display for a Side Step Fancy Fold card. I've been thinking about doing something like this for awhile, and since I got my newsletter finished and posted yesterday, I had a little time today to come up with an interesting design.

I'm planning to recreate this card and show you how to do a side step fancy fold in my Facebook Live session today at 11 am on my Playing with Papercrafting Facebook page. It's been converted into a YouTube video for you here:


Now, take a closer look and I'll list the materials and measurements here:

side step card with peaceful boughs 2

  • To create the card base for this fancy fold Side Step card, I used the following template (cut on the solid lines and score and fold on the dotted lines):
sidestep diagram

  • After scoring and folding the card base I used the curved snow bank dies from the Pine Woods Die set to die cut the snow curves for the steps. I started with Whisper White cardstock with these dimensions:
        5 1/2" x 1 1/4", 3 1/2" x 1 1/2", and 3 1/2" x 2 1/4"
  • The sentiment on the side piece is from Peaceful Boughs and it's embossed in Silver Stampin' Emboss Powder on a piece of Whisper White cardstock that measures 2 3/4" x 3 1/4".
  • The reindeer is die cut from Bronze Brushed Metallic cardstock measuring 2" x 3".
  • The white trees can be die cut with the dies from In the Woods die set on a piece of Whisper White measuring 3 1/2" square.
  • The large evergreen is from the Pine Woods Dies and is die cut from a piece of Silver Foil at least 2 1/4" x 3 1/4". You'll need 2 of those.
  • You'll need 3 smaller evergreens, die cut from Silver Foil pieces at least 2 1/4" x 3 1/4".
  • Then you just have to glue everything on the card base, making sure the edges of the objects do not overextend the edge of the card.
And that's it! Watch for the video later today!

Happy Stampin'

side step card with peaceful boughs 3

If you live in Canada, and don't have a Stampin' Up! demonstrator, I'd love to be yours. I can help you with ideas, get you catalogues and provide you with Stampin' Up products. You can leave a message in the comments or contact me using any of the methods listed in the right side bar at the top of the page. You can shop with me from anywhere in Canada by clicking on the SHOP NOW button in the top menu or clicking on any of products below from my Online Store.

Product List

Wednesday, August 12, 2020

Wishes & Wonder for New at SU Blog Hop


Welcome to our NEW AT SU! Blog hop! We are a group of Stampin’ Up! demonstrators from around the world who are Hoppin’ with creative paper crafting ideas to share with you. Today we are showcasing the new 2020 Aug/Dec Mini Catalogue and all it's beautiful new holiday products. I am using the Wishes & Wonder Bundle to create a card and 3D candy or treat holder that go together and I think you'll have fun with the two projects.


  • Those stately reindeer look like they are just waiting to be hitched to a sleigh so after featuring one of them on my card front, I had to make a 3D project using the Mini Curvy Keepsake Box to support the sleigh.
Let's take a closer look at the card first:

  • On a Crumb Cake card base I used a card from the Wonder of the Season Memories & More Card Pack for the back ground. It was a 4" x 6" card so I had to cut the length down to 5 1/4". It worked better than any of the paper in the 'Tis the Season DSP because of the gold in it, which complemented my design.
  • I die cut a rectangle of the Wonder of the Season Specialty Designer Series Paper with the Stitched Rectangle Dies and then used one of the Stitched So Sweetly Stitched Scalloped Rectangle dies to die cut a frame for it in Gold Foil. I used the same Gold Foil Sheet to die cut one of the reindeer which I added to the card front using dimensionals and mini dimensionals.
  • The two sentiments, or rather the sentiment and the medallion were stamped on Whisper White with Versamark Ink, and heat embossed using Gold Stampin' Emboss Powder. The lower sentiment was just cut out on a strip and glued to the card front using Stampin' Seal.
  • The medallion was die cut using dies from the North Pole Wonder Dies, including the backing in Real Red and some Shaded Spruce Argyle ribbon was added using Stampin' Seal+. The Medallion was attached to the card front with dimensionals.
  • I made a Curvy Keepsake Box from Crumb Cake cardstock. (So easy!) It is perfect for a couple of Hersey Kisses inside.
  • I heat embossed the sleigh image twice with Gold Stampin' Emboss Powder on Real Red cardstock and die cut with North Pole Wonder dies. Then the die cut sleigh were attached to the Curvy Keepsake box using Stampin' Seal+.
  • Two more reindeer were die cut using the same set from Gold Foil sheets and set upright on Crumb Cake cardstock using Glue Dots on their feet and a strip of Foam Adhesive strip to help prop them up on the wrong side, near their feet.
  • I stamped the fir tree from the Winter Woods stamp set from the Annual Catalogue and die cut it with the coordination In the Woods dies and set it upright in a similar fashion.
  • I used the Gold Cord from the Wonder of the Season Ribbon Combo Pack as reins around the necks of the reindeer and tied to the handle of the Curvy Keepsake box.

I hope you enjoyed my project with the Wishes & Wonder Bundle. Now please hop on over to Aneke's blog to see what's new with SU in her world:


Here's the list of bloggers in our New At SU August Blog Hop to help you keep on track:

Please take a moment to comment at the bottom of this post and let me know how you liked my projects or ask me a question about the technique used. Don’t forget to scroll back up and keep hoppin’ with us! – Thank you!
Keep Creating!
Heather Cooper

Please contact your Stampin’ Up! demonstrator if you have any questions or to make a product purchase. If you do not have a demonstrator, I would be happy to answer any questions about products, or the techniques shown here. If you live in Canada, you can use the links below to order products from me or join my Papercraft Cats team. 


Product List