Showing posts with label Brilliant Wings dies. Show all posts

Friday, March 26, 2021

Easter Cards for Grandkids - On the Fly

easter cards for grandkids on the fly 1

 Tuesday was a bit hectic! I needed to finish the birthday card for my husband's birthday the next day, but it was time to mail out the Easter treats for my 6 grandchildren as well. I love how my husband put it: "When you're finished my birthday card, just whip up six cards for the grandkids so we can get their treats mailed out!" Right! How long has he been living with me and my Stampin' Up! business? Long enough to know that you don't just "whip up" six cards.

Well, that's until the Butterfly Bijou Designer Series Paper, which I just found out has been completely sold out! And now I guess I know why! Not only does it have beautiful butterfly images that coordinate with the composite butterfly die, but it also has amazing background papers as well, and in beautiful bright spring colours.

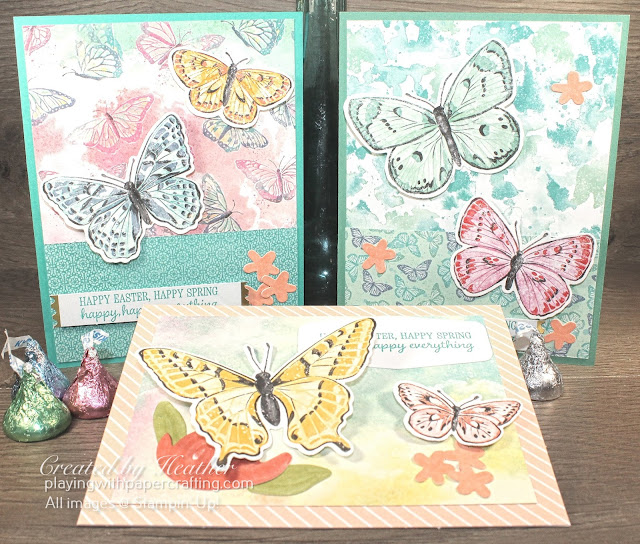
And when I teamed that up with some left over Paper Pumpkin embellishments and a couple of card bases, it turns out that I could just "whip up" 6 Easter cards for the grandkids! Take a closer look at the samples that I made 2 each of:

easter cards for grandkids on the fly 2

  • I have four grandsons and two granddaughters, so the card in the front was the one I used for the girls. The card base is a left over one from an old Paper Pumpkin kit. Don't ask me which one. On it I added the background from the flip side of the large butterfly side, the one where I die cut the butterflies that coordinate with the composite butterflies die. I just trimmed it down to 3 3/4" x 5".
  • The back two cards are for the boys. I made 2 each of those. The background papers you see are all from the Butterfly Bijou DSP.
  • The sentiments are on labels that I found in more old Paper Pumpkin Kits, so no die cutting needed.
  • Let's look at each design separately:
petal pink girls' card

  • I don't think the card base is Petal Pink, I think it might be the old In Colour, Grapefruit Grove, but I love how it looks anyway.
  • The flowers and leaves are stick ons from an old Paper Pumpkin Kit as well.
  • The sentiment label is also from a Paper Pumpkin Kit, but the sentiment is from the Timeless Tulips set.
bermuda bay boys card

  • The background paper is from Butterfly Bijou and the strip at the bottom is its flip side.
  • The flower embellishments are stick ons from that past Paper Pumpkin kit and the label is as well.
  • The sentiment is stamped in Bermuda Bay and is from the Timeless Tulips set.
mint macaron boys card

  • The background paper here again is from the Butterfly Bijou and the strip at the bottom is its flip side again.
  • The flower embellishments and label are, again, from old Paper Pumpkin kits.
  • Same ink and sentiment here as on the other boys' card.
Although I didn't photograph the insides, I used the A Grand Kid stamp set for sentiments before writing in them and mailing them off! Mission completed!

last chance products sale 1

Right now you can save money on products from 2020/21 Annual Catalogue that will be retiring when the new 2021/22 Annual Catalogue comes out at the beginning of May. And some of the savings are significant! Up to 60% off! Follow this link to check out the savings:


easter cards for grandkids on the fly 3


If you live in Canada, and don't have a Stampin' Up! demonstrator, I'd love to be yours. I can help you with ideas, get you catalogues and provide you with Stampin' Up products. You can leave a message in the comments or contact me using any of the methods listed in the right side bar at the top of the page. You can shop with me from anywhere in Canada by clicking on the SHOP NOW button in the top menu or clicking on any of products below from my Online Store.

Product List

Plus leftover card bases, stickers and embellishments from past Paper Pumpkin kits.

Friday, March 12, 2021

Butterfly Brilliance with Alcohol Blend Technique

butterfly brilliance with alcohol blend 1

 This is the last of my White Wash technique posts, but today I am using a different bundle - the Butterfly Brilliance bundle and I'm trying out a different technique for the background, Alcohol Blend technique which I learned from Linda Bedinger from Inks and Ingenuity. I also continued to use the White Wash Technique on the top butterfly in each of the two trios, which was a little trickier for these butterflies because the areas within which you could colour them was much smaller.

Here's a close look at the card:

butterfly brilliance with alcohol blend 2

  • The background is made by colouring on vellum with 2 or 3 colours of Stampin' Blends markers ( I used Bermuda Bay and Mint Macaron here) then using a Water Painter brush to daub on some alcohol which activates the alcohol as the base of the ink in the markers to blend in interesting ways.
  • Linda recommends 90% alcohol, but I only had 70% which could have been why I had issues with my vellum curling up as it dried. It required a lot of Stampin' Seal+ to keep it glued flat to the Mint Macaron cardstock it was adhered to and again on the Mint Macaron to keep it flat on the Bermuda Bay card base.
  • I stamped my bottom butterflies in Tuxedo Black ink using the Stamparatus, perfect when you have such a large composite stamp like that. You can touch up any areas that didn't get enough ink without worrying that you can't line up your stamp and image again. I coloured the ones I wanted with Stampin' Blends combos. The larger butterfly was coloured with Bermuda Bay/Mint Macaron, the smaller with Highland Heather/Flirty Flamingo.
  • I die cut these with the large composite die from the Brilliant Wings Dies.
  • Then I die cut the matching detail image from vellum. These were tricky to die cut, just finding the right pressure. First you have to die cut the outline with the composite die, then use the detail die to finish the cut outs.
butterfly brilliance with alcohol blend 3

  • Then I did the White Wash technique on a smaller matching butterfly by stamping the large composite image on Crumb Cake with Versamark ink and heat embossing it with White Stampin' Emboss Powder.
  • I then "white washed the image" with a runny wash of White Craft Ink and water, and dried it thoroughly.
  • I added a small amount of colour to the sections of the wings using Stampin' Write Markers of the same colours as the larger butterflies and blended the colour into the white wash using a blender pen.
  • All three butterflies were curved a bit and mounted on top of each other as shown using glue dots.
I hope you like the result. I struggled with it a bit. It took some trial and error, but it was worth the effort!


april paper pumpkin 1


It's time to start thinking about subscribing to April's cool new Paper Pumpkin kit! You have until Apr. 10 to subscribe! It's a great one to share with your kids and grandkids!

april paper pumpkin 2

To subscribe click HERE.


butterfly brilliance with alcohol blend 4

If you live in Canada, and don't have a Stampin' Up! demonstrator, I'd love to be yours. I can help you with ideas, get you catalogues and provide you with Stampin' Up products. You can leave a message in the comments or contact me using any of the methods listed in the right side bar at the top of the page. You can shop with me from anywhere in Canada by clicking on the SHOP NOW button in the top menu or clicking on any of products below from my Online Store.

Product List
Blender Pens
[102845]
$16.25
Stamparatus
[146276]
$67.00