Showing posts with label Red Glimmer paper. Show all posts

Friday, June 30, 2017

Happy 150th Birthday Canada! for AYSI#153


This is an exciting weekend if you are a Canadian! Our wonderful country turns 150 years old on July 1st! That's a pretty big deal for us! I remember when Canada celebrated it's 100th birthday back in 1967! I was just a kid then, but it made for some lasting memories. Our country has come so far in 50 years. I believe we've grown up and we have become more and more respected among the nations of the world.

Don't get me wrong, Canada still has plenty of domestic problems to deal with, the worst of which is our treatment of our aboriginal people, which seems to be taking forever to improve and is a scar on our reputation, but there is a lot that we can take pride in and I am very proud to be Canadian!


The moment I saw the Colourful Seasons Bundle, with the Seasonal Layers Thinlits, I knew right away that I would be using them to make the best Canada Day card ever! In fact, I even wondered if Stampin' Up! had brought that set out on purpose, with all those awesome maple leaves, knowing that it was Canada's 150th birthday this year. Thanks for that SU!

And, of course, being Friday, it just happens to be an As You See It Challenge Friday and Amanda's sketch worked perfectly for my Canada Day card:


Here's my Happy Birthday Salute to Canada:


  • The colours are, of course, red and white, because our flag is red and white with that iconic maple leaf in the middle. I used Real Red and Whisper White cardstock and Red Glimmer Paper!
  • The Whisper White layer was cut at one end and split a little so you could see the Red Glimmer paper beneath it. It was also embossed using the Softly Falling Embossing Folder with the highest concentration of dots near the cut and then gradually decreasing the further away you get in each direction, left and right. This could represent snow, which we get a lot of in the winter, but it also made me think of fireworks for celebration. These also represent the lace on the challenge sketch.
  • I die cut several maple leaves - two sizes, two different papers, and either solid or intricately die cut and arranged them around the cut line.
  • The sentiment I had to do on the computer to get it small enough. Even though Stampin' Up! divested itself of My Digital Studio a couple of years ago, I still have the program loaded on my computer and still use it for situations like this where I can get a relatively accurate colour match for the Stampin' Up! colours. I die cut it with the banner from the Bunch of Banners Framelits with the border from that framelit cut in Red Glimmer Paper.
  • Here you can see the texture of the Softly Falling Embossing Folder a little better:


Two Days Left to Win Blog Candy

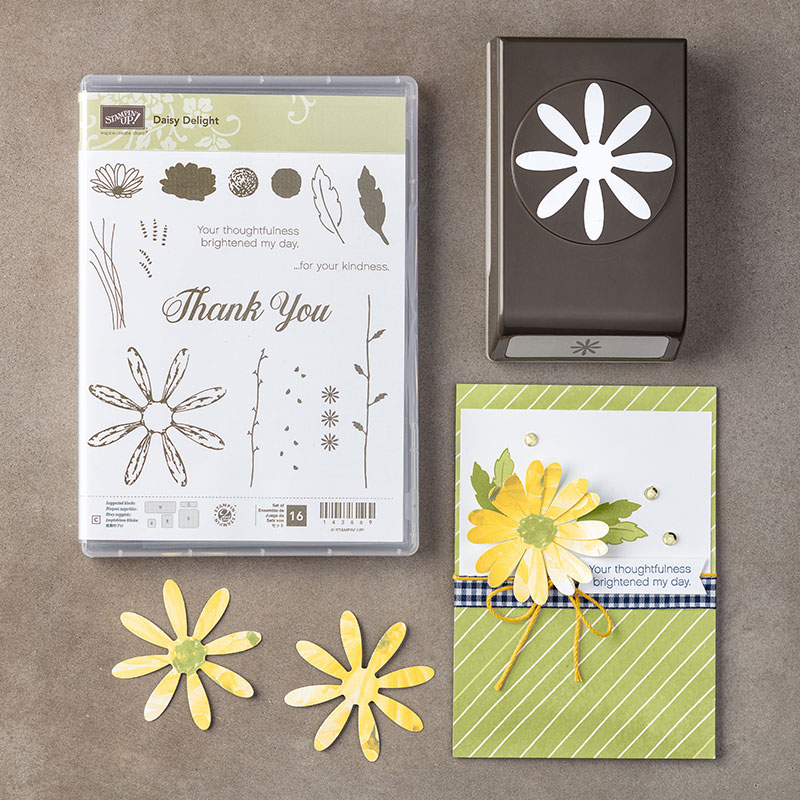
I am actually surprised that I haven't had more people commenting on my blog, because the prize is a pretty good one! It's a brand new Daisy Delight Bundle PLUS a pack of Delightful Daisy Designer Series Paper!


AND:


This is a great prize, people! And brand new! And delivered right to your door if you are a resident of Canada!


Remember Bonus Days last summer? You earn $6 coupons in July that you can redeem in August toward new products. To earn the coupons you must spend $60 on an order during the month of July and then Stampin' Up! will mail you a bonus coupon code that you can use in August. So get ready to put together some packages worth $60 to earn as many coupons as you can manage, and then you can have a spending spree in August on Stampin' Up!'s money!


Click on the links below to take you to my On-Line Store, where you can read about, look at, and purchase if you wish, the products used to make this card today.


Product List

Friday, February 3, 2017

Sunshine Wishes for Just Add Ink


Valentine's Day is coming soon and I really haven't done many Valentine cards so I thought I should try another design. I've been dying to use the Sunshine Wishes Thinlits again, as well, and they were perfect for a challenge I saw at the Just Add Ink Challenge Blog this week:

With a delicious colour combination from the Colour Throwdown Challenge folks, I was ready to go to it!


I mean, look at that inspiration photo! Red, pink, chocolate and white! Tomorrow, I have a Mom & Me class and I needed a project for the moms to do on their own. I thought they would have fun with this one.


  • I started with an Early Espresso base and layered it with a simple striped panel from the Sending Love Designer Series Paper Stack.
  • I got out my Watercolour Pencils and Aqua Painter and did a little watercolour scribble on the Whisper White background. I had to use the pencil colours available. The Real Red and Early Espresso were perfect, but the only pink is Melon Mambo and it's a wee bit off Blushing Bride But with water from the Aqua Painter and the Real Red mixed in, it tones down considerably. You have to be really careful not to add too much water to this on the Whisper White, just enough to blend it and move the colour around.
  • I die cut the hearts from Red and Blushing Bride Glimmer Paper. It worked better to die cut the back of the glimmer paper. It just preserved the glitter finish and it was easier to cut and to get out of the die.
  • The word love is also part of the Sunshine Wishes set and it is cut from Early Espresso here with clear Wink of Stella added to only the lower part of the letters for a different look.
  • The Fine Tip Glue Pen was perfect for gluing all the small areas on to the project. It was especially tricky gluing the banner, word and red heart on as they are interwoven. I glued the heart and word to the banner and then glued all to the project.

There are three new Sale-A-Bration Rewards being offered starting Feb. 21 and you can see a little sneak peek here! Check out that glimmer paper in particular! I think it's going to be a best seller! More on these later!


Click on the links below to take you to my On-Line Store, where you can read about, look at, and purchase if you wish, the products used to make this card today.


Product List

Friday, July 1, 2016

O Canada for As You See It Challenges!


So our next As You See It Challenge happens to fall on Canada Day, July 1st! And being a proud Canadian, I wanted to celebrate Canada's 149th birthday. I also wanted to play with my new Flourish Thinlits, as they've been sitting there for quite awhile without any attention. So to put them all together, I came up with a red and white card to meet the requirements of our As You See It Challenge #138.

What do you know about Canada? Well, let our astronaut who served as commander of the international space station for 3 months, Chris Hadfield, and his brother, Dave, entertain you with some info about our beloved country:


By the way, if you enjoyed this, you should see Chris Hadfield's version of David Bowie's Space Oddity, sung from outer space!

Anyway, back to stamping! Here's my card for Canada Day!


  • In order to accomplish my goal, I needed to use a couple of retired products! (Fifty lashes with a wet noodle!) I'm having a hard time letting go of my Corrugated Paper cause I love the texture and it also helped me to line up my letters straight! And speaking of letters, I have no alphabets right now - stamps or dies - so I went back to my Little Letters Thinlits (which I have not given up, because they are so useful for 3D and decor projects) to make my O Canada - pronounced C-eh-N-eh-D-eh!
  • I love the white on white of the flourish on the corrugated paper. The shades of white are just a little different, but enough, along with the texture, to be able to distinguish the flourish. I fiddled around with a red panel on the white card base, and a red flourish, but both of them detracted the maple leaf image, which is the focal point of the card.
  • I used some of the Flourish Thinlits to die cut the flowers from the Red Glimmer Paper maple leaf, die cut with the Leaflets Framelits, and then re-embedded them in the leaf to give it a lacy, less solid effect. I also used a couple of the flowers as embellishments on the card.
  • The Fine Tip Glue Pen, the Precision Base Plate for the Big Shot and the Big Shot Die Brush came in very handy for this project. You'll want to consider getting them if you plan on using the intricate dies such as this set.
That's it for me! I'm going to go hang a Canadian flag off my balcony! Have a great weekend!


Click on the links below to take you to my On-Line Store, where you can read about, look at, and purchase if you wish, the products used to make this card today.


Product List
Kraft And White Corrugated Paper
Kraft And White Corrugated Paper*
[138317]
Little Letters Thinlits Die
Little Letters Thinlits Die*
[133730]
*Retired Products