Showing posts with label Gold Stampin' Emboss powder. Show all posts

Monday, February 8, 2021

Game On Masculine Valentine

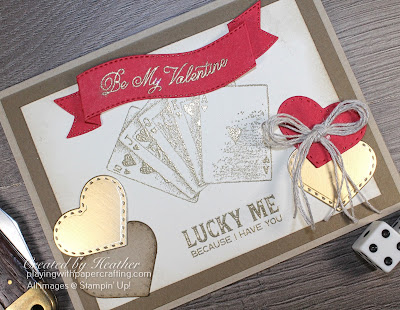
game on masculine valentine 1

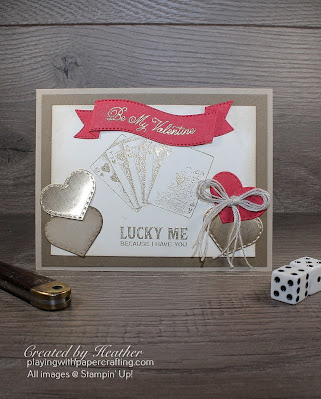
 It's that time of year again, when I create a new creative design for a masculine valentine for my hubby, who some of my customers refer to as Mr. Stampin' Up!, because he delivers their orders to them for me! This year I used Game On for my design. I don't know if you noticed, but all the cards in the image with the playing cards are hearts! In fact it's a royal flush of hearts, one of the rarest hands in poker!! I can't think of a better metaphor for a good husband in marriage that has lasted for almost 43 years! Lucky me, indeed!

I'll be featuring this card in my Monday Morning Live on Facebook today so tune in at 11 am PST to Playing with Papercrafting:


game on masculine valentine 2

  • My Crumb Cake base is 5 1/2" x 8 1/2", scored at 4 1/4" on the long side.
  • The next layer is Soft Suede, cut at 5 1/4" x 4".
  • The Very Vanilla panel is 3 1/2" x 4 3/4". It's sponged around the edges with Soft Suede. On it the images are embossed in Gold Stampin' Emboss Powder, even the sentiment on the banner.
  • The images are from Game On, including the bottom sentiment.
  • The sentiment on the top banner is from the Always in My Heart stamp set and is die cut with the Floral Heart dies.
  • All the small hearts are die cut with the small stitched heart in the Mini Curvy Keepsakes Dies. You'll notice that they don't have the hole for the tag that that die has built in. That's because I got my husband to take it off with some metal cutters because I wanted a small heart of that shape.
  • The hearts are Crumb Cake, sponged with Soft Suede, Real Red, and Gold Brushed Metallic cardstock, which won't be available again until the next July/Dec Mini Catalogue, but I have a ton of it left.
  • The final embellishment is a bow tied with a quadruple layer of linen thread and added with a glue dot.

That's the materials and measurement used. Tune into my Facebook live this morning to see how to put it together, or catch the replay on YouTube.

feb online technique class

Especially if you live out of town, today is the deadline to sign up for my February Technique Online class, where we are featuring Fun Folds. We'll be doing a Lever Card, an Accordion card and a Crossover card!

Here are the details: 

You asked for Fun Folds and Fun Folds is the focus of February's Online Technique class. We will be doing 6 cards - 2 each of 3 different fun folds: Lever card, Crossover card, and an Accordian card, shown above. You can choose sentiments of your choice from your own stamp sets so the cards will be all occasion.

Note: I will send you class packages containing cardstock and DSP, cut, punched and die cut, along with embellishments, but I'm not allowed to send you prestamped images, due to copyright issues. You will need a basic list of supplies or alternatives to complete your projects that you can find below.

Option 1
The paper package with all the cardstock, DSP (cut, punched & die cut) & extras for $20.
Option 2

The paper package with all the cardstock, DSP (cut, punched & die cut) & extras is free with an order of $30 or more from my Online Store.  Don't forget that it is Sale-A-Bration and orders of $60 or more earn Sale-A-Bration rewards from the SAB Brochure.

Date: Saturday, Feb. 20, 1 pm. using Facebook Live with links to the YouTube Replay afterwards.
Register HERE by Monday, Feb. 8.

I hope to have some of you join with me.

game on masculine valentine 3

If you live in Canada, and don't have a Stampin' Up! demonstrator, I'd love to be yours. I can help you with ideas, get you catalogues and provide you with Stampin' Up products. You can leave a message in the comments or contact me using any of the methods listed in the right side bar at the top of the page. You can shop with me from anywhere in Canada by clicking on the SHOP NOW button in the top menu or clicking on any of products below from my Online Store.

Product List

Friday, December 4, 2020

Classic Christmas Cherish the Season for AYSI #240


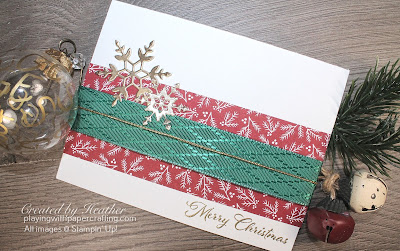
classic christmas cherish the season 1

Every second Friday over at As You See It Challenges, we have a new challenge for you and today is the day. This time it's a Recipe Challenge and you are given some specific ingredients that you have to use to build your project. Here's our Challenge banner:

classic christmas cherish the season 2

As a Design Team member, I have to do a sample card for the challenge and I felt for the first time this year, that I was almost done with making Christmas cards! Mind you, this doesn't have to be a Christmas card, that's not specified anywhere on the challenge, but with snowflakes, red or green and mitten symbols on the graphic, it does make you think of Christmas! AND it's our last challenge before Christmas, too, so there's that!

I used a potpourri of different sets including the Classic Christmas 6 x 6 Designer Series Paper, the Cherish the Season stamp set, the Wonder of the Season Ribbon Combo Pack, and the So Many Snowflakes Dies to get in all the elements. Take a look:

classic christmas cherish the season 3

  • On a base of Thick Whisper White cardstock, I embossed the sentiment from the Cherish the Season stamp set with Gold Embossing Powdeer.
  • I added some of the Cherry Cobbler DSP from the Classic Christmas DSP which is only available until January 4th. Around the piece of DSP I added a piece of the Shaded Spruce ribbon and the Gold Cord from the Wonder of the Season Ribbon Combo Pack.
  • I used the Brass Brushed Metallic Cardstock from which to die cut a couple of snowflake die cuts using the So Many Snowflakes die set.
We've been decorating at our house and I'm getting back to it tonight. We've got our tree up:


I don't always put this much effort into it, because we usually go away for Christmas to be with one of our 3 daughters, but this year it looks like we'll be on our own, so we're having fun enhancing our environment! Just bought a whole whack of jigsaw puzzles, too! We're ready!

classic christmas cherish the season 4

If you live in Canada, and don't have a Stampin' Up! demonstrator, I'd love to be yours. I can help you with ideas, get you catalogues and provide you with Stampin' Up products. You can leave a message in the comments or contact me using any of the methods listed in the right side bar at the top of the page. You can shop with me from anywhere in Canada by clicking on the SHOP NOW button in the top menu or clicking on any of products below from my Online Store.

Product List

Monday, January 23, 2017

So Detailed Thinlits for Freshly Made Sketches


The beauty and elegance of some of the new Stampin' Up! products in our Occasions Catalogue is beyond compare really and I had a brain wave when I was planning my card yesterday. I wanted to use one of my detailed dies and then emboss the die cut with Gold Stampin' Emboss Powder (or any metallic embossing powder for that matter). Then I saw the latest Freshly Made Sketches' Challenge for this week and I knew which one I wanted to use: Here's the layout:


It was perfect for the So Detailed Thinlit Dies and I could just see the beautiful Falling in Love Designer Series Paper behind it! Then I had to find some sentiments to fit the die cuts and that turned out to be a difficult task. You see, my sister's best friend, since she was in high school 48 years ago, passed away yesterday, and I wanted to make a sympathy card for her. I turned to the Wetlands stamp set and the Flourishing Phrases set for the sentiments.


  • After die cutting the center band, I embossed the Thinking of You sentiment on the center section. I had to be very careful with it because it just fits! Then I pressed the intricately die cut parts into the Versamark ink and sprinkled on more Gold Stampin' Emboss Powder, using a paint brush to brush away any powder that was too heavily concentrated. Then I heat set it with the Heat Tool. Likewise, I embossed the sentiment at the bottom of the Very Vanilla panel in gold.
  • I centered the die cut panel on a piece of the Falling In Love Designer Series Paper, as wide as the Very Vanilla panel but shorter and glued both pieces onto the card front of Sahara Sand.
  •  I used the new Very Vanilla 1/4" Satin Ribbon to tie a small bow to add to card front as well.


Click on the links below to take you to my On-Line Store, where you can read about, look at, and purchase if you wish, the products used to make this card today.


Product List