Showing posts with label paper piecing. Show all posts

Friday, January 10, 2025

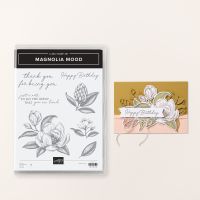
Magnolia Mood Dies for As You See It Challenge #339


magnolia mood dies for aysi #339 1

It feels like forever since I last wrote a blog post. We've had a bit of a hiatus over at As You See It Challenges, but we're back now and the first challenge of 2025 is a colour challenge, chosen by yours truly. Take a look at our challenge banner to see the colour palette I chose:

challenge #339

The challenge is entitled Winter Frost, thanks to the inspiration photo, but the colours are Berry Burst, Basic Gray, Smoky Slate and Peach Pie.
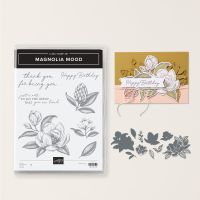
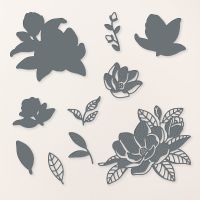
I picked out the Magnolia Mood bundle for this one because I felt the colours would look good with the images, but when I went to colour them in with my Stampin' Blends markers, I found that my Light Smoky Slate marker was dry. So, instead, I decided to use the dies to create the images using a kind of paper piecing technique. By the way, this bundle is on the Last Chance list as long as supplies last.

Here's how it turned out:

magnolia mood dies for aysi #339 2

I die cut the image 4 times, once in each of the colours in the challenge. Using the Berry Burst image as the base, I cut out the flower centers from the Peach Pie die cut and glued it on the flower centers. I cut out all the Smoky Slate leaves from the larger die cut and glued them over the leaves on the Berry Burst die cut, matching them exactly. I cut out all the solid leaves on the Basic Gray large die cut and glued those over the Smoky Slate solid leaves on the large die cut.  I die cut some individual loose leaves in Smoky Slate and Basic Gray and used those behind the smaller die cut.

The sentiment is from the Magnolia Mood stamp set and I stamped it in Berry Burst ink and die cut it with a banner from the Stylish Shapes dies, then added it to the card front with dimensionals.

It's Sale-A-Bration Time:


magnolia mood dies for aysi challenge #339 3


If you live in Canada, and don't have a Stampin' Up! demonstrator, I'd love to be yours. I can help you with ideas, get you catalogues and provide you with Stampin' Up products. You can leave a message in the comments or contact me using any of the methods listed in the right side bar at the top of the page. You can shop with me from anywhere in Canada by clicking on the SHOP NOW button in the top menu or clicking on any of products below from my Online Store.
Product List

Monday, February 17, 2020

Paper Piecing with Beautiful Moments


I'm looking for some fairly simple designs for my Quick & Cute class coming up on Thursday night. (Tuesday is the deadline for registration.) The Beautiful Moments stamp set has some great images that don't need a lot of extra work for them to look effective. But then I spotted a piece of the Peaceful Poppies Designer Series Paper, with a smaller design on it and thought that it would make a great design for paper piecing and a diabolical thought crossed my mind! 

Yes, I thought of using the Mom and daughter stamp and paper piecing their dresses to be look-alikes using the Peaceful Poppies DSP! Now, technically, any card involving fussy cutting, might not be classified as simple, but these are such simple shapes to cut out that it doesn't take much skill. It's a good first project!

Here's how it turned out:

  • Stamp the mother & daughter image from Beautiful Moments in two places. One place is the Whisper White panel in the middle, and the other place is in the center of the Peaceful Poppies DSP that is behind the white panel. Because it is right in the center, when you cut the images out from there, they will be covered by the white cardstock and not visible when the card is put together. Stamp the birds and the sentiment before adding the paper piecing, in case you have an issue with the stamping, so you can restamp on the other side, before gluing on the DSP.
  • Then poke a hole in the DSP right beside the mom's dress image and roughly cut it out, not worrying about details. Do the same with the little girl's dress. Then use your Paper Snips to trim each image, just the dress part of the image, cutting as close to the outside edge of the stamped line as possible.
  • Add adhesive to the DSP dresses and match them up to the stamped images on the white cardstock and glue them as shown. 
  • Back the DSP and the white cardstock with a Basic Black cardstock matte and glue the DSP to the card base and use dimensionals to add the white cardstock to the card front.
That's the card! I find it so cute and so easy to do! What do you think??


Have you been thinking about getting the Stampin' Up! Starter Kit and becoming a demonstrator? Here's Natalie to explain why this is a great time to do it:


A mini paper cutter, a 6 x 6 sampler of DSP, and any stamp set of your choice? Great reasons to sign up now, on top of free shipping and $165 worth of your choice of products for only $135! To join my team, just click Join My Team in the top menu and follow the leads.


If you live in Canada, and don't have a Stampin' Up! demonstrator, I'd love to be yours. I can help you with ideas, get you catalogues and provide you with Stampin' Up products. You can leave a message in the comments or contact me using any of the methods listed in the right side bar at the top of the page. You can shop with me from anywhere in Canada by clicking on the SHOP NOW button in the top menu or clicking on any of products below from my OnLine Store.

Product List
Paper Snips
[103579]
$13.50

Wednesday, July 25, 2018

Serene Garden for The Paper Players


Serene Garden makes the most beautiful designs for elegant cards. When you pair the stamp set with the Garden Scene Framelits and the Stitched Label Framelits, you bump up the elegance factor by at least ten! It's a perfect combination for an Anniversary Card and if you take a look at the bird, I want to tell you about how I did some extra special paper piecing and creating with the Silver Embossing Paste to make the wings look the way they are!

I'm entering this card in The Paper Player's 402nd Challenge:


The challenge is to make use of negative space on your card, and that's precisely what one of the dies in the Garden Scene Framelits is designed to do! Take a closer look:


  • I used the Stamparatus to stamp the main images on the Mint Macaron panel. The reason for using the Stamparatus was to get clear, clean images and to be able to reink and restamp if needed. I stamped the same large image on a smaller piece of Shaded Spruce to fit in behind the Mint Macaron once the pieces in it had been die cut away. There is one framelit in the Garden Scene Framelits that does cut away certain of the leaves. I mounted the Mint Macaron panel on Stampin' Dimensionals over the Shaded Spruce panel, matching the stamped leaves with the die cut holes in the Mint Macaron sheet.
  • The flowers were stamped in Memento Tuxedo Black ink and coloured in with the Flirty Flamingo and Calypso Coral Stampin' Blends Combos. Then they were die cut with dies from the same Garden Scene Framelit set and matched to the flowers in the stamped scene. They were mounted with Mini Stampin' Dimensionals.

  • I embossed the bird with Black Stampin' Emboss Powder on Silver Foil. The wings were from the same image that I stamped in Memento ink on Whisper White. I experimented a bit with our Silver Embossing Paste. Mine is a little on the runny side, which is normally not a plus. I have to mix it with my regular paste or my shimmery paste to use it with masks. But in this case, having it a bit runny was a bonus because I painted it on my bird image with a paint brush. After drying it quickly with my Heat Tool, I got out some Nuvo Embellishment Mousse colours I have - Peony Pink and Coral Calypso and brushed and blended that on just the wings over top of the Silver Embossing Paste. It created quite an ethereal look that I just love. I'm going to have to try it on some other projects.
  • I fussy cut the wings from this bird and paper pieced them onto the Silver Foil bird and added it to my card with Mini Dimensionals.
  • The sentiment is from the Beautiful Bouquet stamp set and it's die cut with a die from the Stitched Labels Framelits, as is the backing in Silver Foil.
I just returned from a lovely holiday, camping with our little fifth wheel in Banff National Park. Even though the town is very touristy and crowded this time of year, we still had a great time and I can't say enough good things about the well-run camp grounds. I've never stayed in a camp ground that was so quiet and had so little in the way of night time interruptions of sleep! It was almost too quiet. Everyone seemed to either stay in their RVs or they were gone for the day. It was hard to meet anyone. Here are a few photos of our time away:


Some of the gorgeous Rocky Mountain scenery around Banff and the Bow Valley! Aren't those mountains majestic?


These formations are known as Hoodoos, eroded by ice, wind and water over thousands of years.


We spent a day with our nephew at the Calgary zoo as well:
The zoo has a new Giant Panda exhibit for awhile!


Ken and I at Lake Louise!


Click on the links below to take you to my On-Line Store, where you can read about, look at, and purchase if you wish, the products used to make this card today.


Product List
Heat Tool
[129053]
$40.00
Big Shot
[143263]
$150.00
Glue Dots
[103683]
$7.00