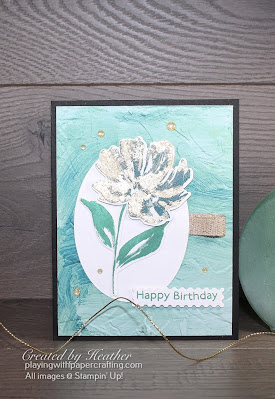
I've had the Gilded Leafing Embellishment for a long time now, but I've been a little reluctant to use it, due to lack of time around Christmas and lack of experience with it, but today I decided it was time to embrace that learning curve and get to know how to use it.
It is amazingly light stuff, just a puff of air will send it flying, so I'm going to find a larger, deeper container to store it in. You need Heat & Stick Powder or any other kind of sticky surface to adhere it to, such as Tear & Tape or our Seal or Adhesive sheets. I'm planning to use it when I do my Facebook Live Presentation on Monday at 11 am PST.
Here's a closer look at that gilding:
- I started with a Basic Black card base - 5 1/2" x 8 1/2" and scored at 4 1/4". I cut a piece of Fine Art Floral Designer Series Paper to 4" x 5 1/4" and ran it through the Stampin' Cut & Emboss Machine using the Painted Texture 3D Embossing Folder, which enhances the texture of the paint strokes on the design.
- I stamped the large floral bloom base in Pretty Peacock on Basic White. Then I stamped the second step stamp image in Versamark Ink and added the Heat & Stick Powder, and set it with the Heat Tool until it just becomes melted and sticky. (The minute it "disappears".)
- I added pieces of the gold leaf to the flower and press them into the Heat & Stick powder. Then I used a soft toothbrush to rub off the excess.
- I stamped the leaves and the sentiment (both from the same Art Gallery stamp set) in Just Jade ink and die cut them using the coordinating Floral Gallery Dies.
- Using the Layering Oval dies, the largest plain oval was die cut from Basic White and a loop of Fine Art Ribbon adhered to the back using Stampin' Seal+. This was added to the card front.
- The leaves were glued to the oval and the large gilded bloom was added using Stampin' Dimensionals. The sentiment was added with Mini Dimensionals. The final touch was some Gold Glitter Enamel Dots.
You can still register for this class although you will not be able to get the class package in time for the Facebook Live. However, you will still be able to complete the class with the Private YouTube Link of the replay that you will receive when you register. To register click HERE.
I'm looking for new people to join my team! It's the best deal in the catalogue and having a 20% discount at the minimum for 4 months or more is a real bonus!
All it takes is $135 and you get $165 worth of any current product of your choice and a chance to join my Papercraft Cats team with a group of stampers who love to create and are crafting businesses that suit their own circumstances and needs! I'd love to be your guide in this regard! To join by purchasing the Starter Kit, click HERE and get a bonus of 5 packs of 6" x 6" brand new Designer Series paper. (Around 200 sheets!)
If you live in Canada, and don't have a Stampin' Up! demonstrator, I'd love to be yours. I can help you with ideas, get you catalogues and provide you with Stampin' Up products. You can leave a message in the comments or contact me using any of the methods listed in the right side bar at the top of the page. You can shop with me from anywhere in Canada by clicking on the SHOP NOW button in the top menu or clicking on any of products below from my Online Store.


No comments :
Post a Comment
I love to read your comments and get to know you better! Thanks for adding one!